
Installation Guide


INSTALLATION WALKTHROUGH:
For more information log onto www.curtmfg.com, & for helpful towing tips log onto www.hitchinfo.com
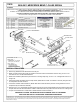
4. Press hitch against the bottom of the bumper beam.
(NOTE: Be sure hitch is centered on vehicle.) Using the
hitch as a template mark hole locations. Lower hitch and
drill marked locations. (NOTE: Start with a small drill bit
for pilot hole. A die grinder with a cone shaped bit may be
easier than drill bits.)
5. Fishwire 1/2-13 x 2" carriage bolt and SP6 spacers through
access hole between the fascia and the back of the bumper
beam and out the holes drilled in STEP 4. Raise hitch back
into position and secure with 1/2-13 flange nuts.
6. Torque all 1/2" fasteners to 75 ft-lbs. Re-install fasteners
removed in STEP 1.
Install is complete.
3. Raise hitch weldment past fascia lip and secure to mounting
strap using 1/2-13 x 1 1/4" carriage bolts and 1/2-13 flange
nuts.