
Owners manual

Parts List
DESCRIPTIONPART NUMBERQTYITEM
NUT PLATE WELDMENTCM-11192-NPW21
HEX BOLT1/2 - 13 x 1 1/242
CONICAL TOOTHED WASHER1/2"43
.250 x 1.00 x 2.00" SQUARE HOLE SPACERCM-SP1824
CARRIAGE BOLT3/8 - 16 x 1 3/42
5
HEX FLANGE NUT
HFN381626
CONICAL TOOTHED WASHER3/8"27
GROSS LOAD CAPACITY WHEN USED AS A WEIGHT CARRYING HITCH: LBS. TRAILER WEIGHT & LBS. TONGUE WEIGHT.
***DO NOT EXCEED VEHICLE MANUFACTURER'S RECOMMENDED TOWING CAPACITY.***
WARNING: ALL NON-TRAILER LOADS APPLIED TO THIS PRODUCT MUST BE SUPPORTED BY AUXILIARY STABILIZING STRAPS.
** FAILURE TO PROPERLY SUPPORT NON-TRAILER LOADS WILL VOID PRODUCT WARRANTY**
HAVING INSTALLATION QUESTIONS? CALL TECHNICAL SUPPORT AT 1-800-798-0813
HITCH WEIGHT:
LBS.
INSTALL TIME
PROFESSIONAL: MINUTES
NOVICE (DIY): MINUTES
INSTALL NOTES:
INSTALLATION STEPS
PERIODICALLY CHECK THIS RECEIVER HITCH TO ENSURE THAT ALL FASTENERS
ARE TIGHT AND THAT ALL STRUCTURAL COMPONENTS ARE SOUND.
Curt Manufacturing Inc., warrants this product to be free of defects in material and/or workmanship at the time of retail purchase by the original purchaser. If the product is found to be defective,
Curt Manufacturing Inc., may repair or replace the product, at their option, when the product is returned, prepaid, with proof of purchase. Alteration to, misuse of, or improper installation of
this product voids the warranty. Curt Manufacturing Inc.'s liability is limited to repair or replacement of products found to be defective, and specifically excludes liability for incidental or
consequential loss or damage.
2000 200
30
150
AUDI A3 SPORT BACK 5 DOOR HATCH
10/5/2012
11192
300
24771
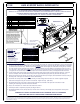
TRUNK PAN
BUMPER BEAM
DRIVER SIDE BUMPER
SUPPORT RAIL
PASSENGER SIDE
BUMPER SUPPORT RAIL
USE HITCH AS A TEMPLATE, DRILL
TWO 1/2" HOLES (BOTH SIDES)
1. To remove the rear bumper, remove (3) torx screws from inside each wheel well. Remove both tail lights by using a socket through
the port on the inside of trunk. Rotate light out of place carefully, so the tabs on the back side stay intact (rotate then pull straight
out from the side to remove lens). Remove 2 torx screws from beneath each tail light (one short black, one long silver). Remove
the 2 torx screws from the underside of the bumper. Using a screwdriver pop off the plastic covers inside the trunk to access (2)
hex nuts using a 10mm deep socket. Note: Be sure the socket you use is deep enough so it will not bottom out on the post. Use
a magnetic arm to catch the nuts. Dettach the bumper cover from the side of the car, then pull straight backwards to remove.
2. Loosen bumper beam to place hitch into position above bumper beam support rails, and back against the trunk pan. Using the
hitch as a template, mark and drill holes into bumper beam support rails (through top side only) and holes into trunk pan.
3. Remove bumper beam from vehicle, (6) hex bolts. May need to lower exhaust (2 hangers) and heat shield for access to trunk pan
mounting holes. Clear spare tire well of ALL contents before drilling.
4. Install hitch onto bumper beam support rails by inserting hex bolts through hitch into frame rail. Hold the supplied nut plates
inside frame and tighten using 3/4" rachet on hex bolt head. Tighten securely. (both sides)
5. Re-install bumper beam onto vehicle. Install carriage bolts from the underside of the spare tire well outward. Install
remaining hex head flange nuts with conical tooth washers.
6. Torque all 1/2" fasteners to 110 lb-ft and all 3/8" fasteners to 45 lb-ft.
7. Trim bumper fascia as required for proper fit (see diagram above).
8. Re-install heat shield, exhaust, bumper fascia (in reverse order of removal), and tail lights (be sure lights work correctly after
re-assembled.
- REMOVE SPARE TIRE
- REMOVE REAR BUMPER
- DRILLING REQUIRED
- REMOVE TAIL LIGHTS
- FASCIA TRIMMING REQUIRED
- MAY REQUIRE EXHAUST AND
HEAT SHIELD LOWERING
1
7
6
2
3
4
5
1
2.00
FASCIA TRIMMING DIAGRAM
2.25
4.75
DESIGNED FOR USE WITH
BALLMOUNT #D-20 / 45520
TOOLS REQUIRED
TORQUE WRENCH
RATCHET
SCREW DRIVER
MAGNETIC PICK-UP TOOL
9" EXTENSION
10mm DEEP WELL SOCKET
13mm SOCKET
3/4" SOCKET
9/16" SOCKET
T-25 TORX