
Installation Guide


HAVING INSTALLATION QUESTIONS? CALL TECHNICAL SUPPORT AT 1-877-287-8634
INSTALLATION STEPS
PERIODICALLY CHECK THIS RECEIVER HITCH TO ENSURE THAT ALL FASTENERS
ARE TIGHT AND THAT ALL STRUCTURAL COMPONENTS ARE SOUND.
Curt Manufacturing LLC., warrants this product to be free of defects in material and/or workmanship at the time of retail purchase by the original purchaser. If the product is found to be defective,
Curt Manufacturing LLC., may repair or replace the product, at their option, when the product is returned, prepaid, with proof of purchase. Alteration to, misuse of, or improper installation of
this product voids the warranty. Curt Manufacturing LLC.'s liability is limited to repair or replacement of products found to be defective, and specifically excludes liability for incidental or
consequential loss or damage.
LEXUS ES 350 AND 300h
1/4/2016
11362
PAGE 2 of 2
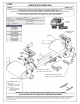
1. Remove the underbody panel by removing the 4 screws (5 on single exhaust models) in the bumper fascia
using a 10mm socket. Remove the 2 push-button fasteners (3 on single exhaust models), unthreading the
(3) plastic nuts (10mm socket) towards the front of the vehicle, and unthreading the (2) plastic nuts (12mm
socket) in the center of the panel. On single exhaust models, remove (1) screw attaching the underbody
cover to the driver side frame rail.
2. Support the exhaust and lower by removing the (2) rubber isolators by each muffler, 1 hanger on the
passenger side by the muffler and (1-2) center isolators (leave isolator by engine attached). Allow exhaust
to be lowered 6-10".
3. Remove the (2) tie down / exhaust hanger brackets from the frame using a 14mm socket. Return brackets
to vehicle owner but keep hardware and rubber isolators for step 5.
4. Remove heat shield(s) using a 10mm socket for access to frame rails. Locate the large hole in the frame
rail on each side and using a die grinder enlarge to allow bolts and spacers to pass through. Reverse
fishwire the supplied bolts and spacers into the enlarged holes on each side using the fishwires provided.
Trim the heat shield as required to allow bolts to pass through.
5. Raise hitch into position, clampig the heat shield(s) between the hitch and the vehicle frame. Using the
fasteners from the brackets, attach hitch to the vertical flange and the frame rail with the fasteners removed
in step 3.
6. Torque all 10mm fasteners to 56 lb-ft and all 7/16" fasteners to 70 lb-ft.
7. Raise exhaust back into location and re-install rubber isolators.
8. ON SINGLE EXHAUST MODEL ONLY: Trim the underbody panel, as shown in the diagrams above, for the
hitch to pass through.
9. Re-install the underbody cover.
Single
Exhaust
Models
5.50"