
Installation Guide
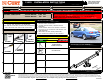
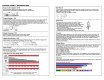

GROSS LOAD CAPACITY WHEN USED AS A WEIGHT CARRYING HITCH: LBS. TRAILER WEIGHT & LBS. TONGUE WEIGHT.
***DO NOT EXCEED VEHICLE MANUFACTURER'S RECOMMENDED TOWING CAPACITY.***
WARNING: ALL NON-TRAILER LOADS APPLIED TO THIS PRODUCT MUST BE SUPPORTED BY 18050 STABILIZING STRAPS.
** FAILURE TO PROPERLY SUPPORT NON-TRAILER LOADS WILL VOID PRODUCT WARRANTY**
HAVING INSTALLATION QUESTIONS? CALL TECHNICAL SUPPORT AT 1-800-798-0813
HITCH WEIGHT: LBS.
INSTALL TIME
PROFESSIONAL: MINUTES
NOVICE (DIY): MINUTES
INSTALL NOTES:
INSTALLATION STEPS
PERIODICALLY CHECK THIS RECEIVER HITCH TO ENSURE THAT ALL FASTENERS
ARE TIGHT AND THAT ALL STRUCTURAL COMPONENTS ARE SOUND.
CURT Manufacturing LLC., warrants this product to be free of defects in material and/or workmanship at the time of retail purchase by the original purchaser.
If the product is found to be defective, CURT Manufacturing LLC., may repair or replace the product, at their option, when the product is returned, prepaid,
with proof of purchase. Alteration to, misuse of, or improper installation of this product voids the warranty. CURT Manufacturing LLC.'s liability is limited to
repair or replacement of products found to be defective, and specifically excludes liability for incidental or consequential loss or damage.
2000 200
27
45
VOLKSWAGEN JETTA TDI
4/24/2015
11410
90
Scan
for more
information
Parts List
DESCRIPTIONPART NUMBERQTYITEM
M8-1.25 x 30 HEX FLANGE BOLT
M8 - 1.25 x 30 HFB41
CARRIAGE BOLT1/2-13 x 1 1/2, GR842
HEX FLANGE NUTHFN 1213, GR843
.250" SPACER11410-SP24
.313" TAIL BRACKET11410-TB1
5
2
4
1
3
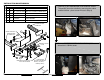
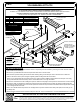
1. Remove (3) torx head bumper cover retention screws. Temporarily lower the exhaust by removing the rubber exhaust isolator.
(Save screws for use in Step 4)
2. Remove the (4) lowest M8 bolts from the bumper beam and return to vehicle owner.
3. Raise hitch into position starting with the drivers side carefully pulling out the bumper cover to allow the hitch to slide into
position. Secure the hitch in place using the supplied (4) M8 hex flange bolts as shown above.
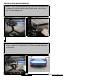
4. Place (2) 1/2" carriage bolts into the square holes in the chain loop plate. Reattach exhaust and secure bumper cover using
the (2) outer fasteners removed in Step 1. Note: Center attachment is no longer accessible.
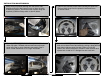
5. Remove the contents of the trunk including the spare tire. Remove both plugs from the spare tire well and return to vehicle owner.
6. Use silicone caulk (or equivalent) to seal the tire well plug hole from exhaust fumes and water by putting a bead around each
hole inside the spare tire well. Place a 11410-SP spacer onto each hole and put a bead of caulk around each square hole. Install
a 1/2" carriage bolt into each hole.
7. Raise 11410-TB tail bracket into position over carriage bolts in spare tire well and hitch safety chain plate, secure with (4) 1/2"
hex flange nuts.
8. Return spare tire and other items removed in Step 8 to the trunk. Torque 1/2" fasteners to 110 ft-lbs and M8 fasteners to 23 ft-lbs.
5
TOOLS REQUIRED
#25 TORX DRIVER
13mm SOCKET
3/4" SOCKET
10" EXTENSION
RATCHET
TORQUE WRENCH
DESIGNED FOR USE WITH
BALL MOUNT #45520
EURO MOUNT
OPTION AVAILABLE
#45561 (1 7/8" BALL)
#45562 (2" BALL)
- Temporarily lower exhaust
- No drilling
SAFETY CHAIN PLATE
PASSENGER SIDE
FRAME RAIL
SPARE TIRE WELL
DRIVER SIDE
FRAME RAIL