
Installation Guide


HAVING INSTALLATION QUESTIONS? CALL TECHNICAL SUPPORT AT
1-877-287-8634
INSTALLATION STEPS
PERIODICALLY CHECK THIS RECEIVER HITCH TO ENSURE THAT ALL FASTENERS
ARE TIGHT AND THAT ALL STRUCTURAL COMPONENTS ARE SOUND.
CURT Manufacturing LLC., warrants this product to be free of defects in material and/or workmanship at the time of retail purchase by the original purchaser. If the product is found to be defective, CURT
Manufacturing LLC., may repair or replace the product, at their option, when the product is returned, prepaid, with proof of purchase. Alteration to, misuse of, or improper installation of this product voids the
warranty. CURT Manufacturing LLC.'s liability is limited to repair or replacement of products found to be defective, and specifically excludes liability for incidental or consequential loss or damage.
This product complies with safety specifications and requirements for connecting devices and towing systems of the state of New York, V.E.S.C.Regulation V-5 and SAE J684.
TOYOTA C-HR / TOYOTA COROLLA HATCHBACK
5/10/2019
11567
PAGE 2 of 2
1. C-HR: Remove the (14) push pin fasteners and (3) twist type fasteners attaching the (2) underbody panels to the
rear of the vehicle. Locate and remove the (6) blue fascia clips holding the lower bumper fascia to the rear bumper
body panel.
Corolla Hatchback: Remove the center portion of the rear bumper fascia by pushing out the tabs on the back.
Note: There are 2 wire harness mounting clips on the top that need to be removed.
2. Using a 12mm socket, remove the (8) bolts attaching the bumper assembly to the rear face of the cabin.
Lightly pull the lower fascia away to remove the bumper beam and return flange bolts to vehicle owner.
3. Using a hammer, flatten the tabs on the end of the bumper beam assembly so they are flush.
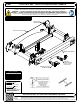
4. Raise the hitch and bumper beam assembly into position and loosely install the supplied fasteners with a
13mm socket.
5. Torque all M8 fasteners to 23 lb-ft.
6. Re-install lower bumper fascia in reverse order of removal.
7. Reinstall the remaining underbody panels removed in step 1.