
Installation Guide
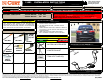


INSTALLATION WALKTHROUGH:
For more information log onto www.curtmfg.com, & for helpful towing tips log onto www.hitchinfo.com
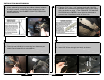
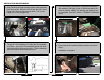
5. Insert fishwires through mounting holes in hitch and raise
hitch into position. Secure it to the U-bolt with 3/8"-16 hex
flange nuts. Remove fishwires and attach 7/16"-14 hex
flange nuts to the carriage bolts.
8. Raise exhaust and reattach rubber isolators removed in
Step 1.
Installation is complete.
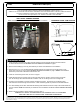
7. Trim heat shield(s) around hitch. Reinstall heat shield(s)
with hardware removed in Step 2. Bend heat sheild over
hitch as needed. NOTE: One fastener per shield will not
be reinstalled. See HEAT SHIELD TRIMMING DIAGRAM
below.
6. Torque all 7/16" hardware to 70 ft-lbs and 3/8" hardware
to 45 ft-lbs. (If present) Trim underbody panel then slide
hitch bracket through trimmed section. Raise underbody
panel into position and reinstall fasteners.
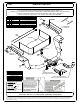
HEAT SHIELD TRIMMING DIAGRAM
NOTE: TRIM DIMENSIONS ARE APPROXIMATE,
CONFIRM FIT PRIOR TO TRIMMING.