
Installation Guide

GROSS LOAD CAPACITY WHEN USED AS A WEIGHT CARRYING HITCH: LBS. TRAILER WEIGHT & LBS. TONGUE WEIGHT.
WARNING: ALL NON-TRAILER LOADS APPLIED TO THIS PRODUCT MUST BE SUPPORTED BY 18050 STABILIZING STRAPS.
HAVING INSTALLATION QUESTIONS? CALL TECHNICAL SUPPORT AT
1-877-287-8634
HITCH WEIGHT: LBS.
INSTALL TIME
PROFESSIONAL: MINUTES
NOVICE (DIY): MINUTES
INSTALL NOTES:
INSTALLATION STEPS
Curt Manufacturing Inc., warrants this product to be free of defects in material and/or workmanship at the time of retail purchase by the original purchaser. If the product is found to be defective,
Curt Manufacturing Inc., may repair or replace the product, at their option, when the product is returned, prepaid, with proof of purchase. Alteration to, misuse of, or improper installation of
this product voids the warranty. Curt Manufacturing Inc.'s liability is limited to repair or replacement of products found to be defective, and specifically excludes liability for incidental or
consequential loss or damage.
2,000 200
31
60
91-95 TOYOTA MR2
12/10/2012
11713
120
247226
Parts List
DESCRIPTIONPART NUMBERQTYITEM
HEX FLANGE NUT7/16-1481
HEX BOLT7/16-14 x 1 1/282
.188" BACKING PLATECM-11713-BP43
1. Temporarily remove the muffler and attached exhaust pipes from the vehicle. Only the muffler system from
the attaching flange rearward needs to be removed. Removing the muffler includes disconnecting the pipe
flange, disconnect bracket near the flange, and remove (2) exhaust hanger plates on each side of the vehicle
above the muffler.
2. There are hanger plates that are connected to the vehicle's floor with (4) weldnuts per side. These weldnuts
can be located from inside the trunk by temporarily pulling away the carpet and floor panels in the trunk until
the nuts are accessible. Weldnuts need to be removed and the holes enlarged to accept 7/16" hardware.
The (4) holes in each exhaust plate also need to be enlarged to accept 7/16" hardware.
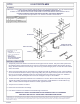
3. Position the hitch against the underside of the vehicle floor as shown, with the hitch behind the rear panel.
Support the muffler and hanger plates below the hitch side plates. Install hardware as shown with the (4)
CM-11713-BP reinforcement plates inside the vehicle, opposite the hitch.
4. Torque all 7/16" fasteners to 70 lb-ft.
5. Reconnect exhaust bracket and flange.
6. Use silicone sealant to seal hardware installed through vehicle floor.
EXHAUST PIPE FLANGE
BRACKET
MUFFLER
1
2
3
VEHICLE FLOOR
- REMOVE EXHAUST
- HOLE ENLARGEMENT REQUIRED
- SILICONE SEAL HARDWARE
ENLARGE HOLES
DESIGNED FOR USE WITH
BALL MOUNT # D-55007 / 45507