
Installation Guide

Parts List
WASHER,FLAT,7/16,YZ30-00166161
WASHER,S-CON,1/2,YZ30-0014912
.250 x 1.00 x 3.00" SQUARE HOLE SPACERCM-SP6
23
HHCS,M12x1.5,70,CL10.9,YZ10-1050514
HHCS,7/16-14 UNC,1-1/4,GRD8,YZ10-104252
5
NUT,SER-FLANGE,7/16-14 UNC,GRD8,YZ20-0010326
GROSS LOAD CAPACITY WHEN USED AS A WEIGHT CARRYING HITCH: LBS. TRAILER WEIGHT & LBS. TONGUE WEIGHT.
***DO NOT EXCEED VEHICLE MANUFACTURER'S RECOMMENDED TOWING CAPACITY.***
WARNING: ALL NON-TRAILER LOADS APPLIED TO THIS PRODUCT MUST BE SUPPORTED BY AUXILIARY STABILIZING STRAPS.
** FAILURE TO PROPERLY SUPPORT NON-TRAILER LOADS WILL VOID PRODUCT WARRANTY**
HAVING INSTALLATION QUESTIONS? CALL TECHNICAL SUPPORT AT 877-287-8634
HITCH WEIGHT: LBS.
INSTALL TIME
PROFESSIONAL: MINUTES
NOVICE (DIY): MINUTES
INSTALL NOTES:
INSTALLATION STEPS
PERIODICALLY CHECK THIS RECEIVER HITCH TO ENSURE THAT ALL FASTENERS
ARE TIGHT AND THAT ALL STRUCTURAL COMPONENTS ARE SOUND.
Curt Manufacturing Inc., warrants this product to be free of defects in material and/or workmanship at the time of retail purchase by the original purchaser. If the product is found to be defective,
Curt Manufacturing Inc., may repair or replace the product, at their option, when the product is returned, prepaid, with proof of purchase. Alteration to, misuse of, or improper installation of
this product voids the warranty. Curt Manufacturing Inc.'s liability is limited to repair or replacement of products found to be defective, and specifically excludes liability for incidental or
consequential loss or damage.
2,000 200
34
40
BMW WAGON 325 xi / 328 xi / 328 i
11/03/2020
11771
80
24749 / 247771
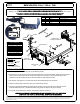
1. Remove (14) fasteners securing two (2) underbody panels.
2. Remove four (4) 12mm nuts from the bumper attachments on both sides which will be reused in step # 3.
Also remove a 12mm bolt from the A-frame and return it to the owner. Place (4) washers per stud
between the bumper attachments and the hitch plates on both sides as shown.
3. Lift the hitch into position over studs and secure with existing flange nuts as shown.
4. Attach mounting strap to the hitch using 7/16" fasteners as shown.
5. Place two (2) spacers between the hitch and the A-frame, and secure with 12mm bolt and conical
toothed washer as shown. Reinstall the lower body panel and trim the fascia as needed.
6. Torque all 12mm fasteners to 82 lb-ft, and all 7/16" fasteners to 59 lb-ft.
- NO DRILLING REQUIRED
- FASCIA TRIMMING REQUIRED
2
3
4
1
A-FRAME
MOUNTING STRAP
EXISTING FLANGE
NUTS
DRIVER SIDE
BUMPER ATTACHMENT
PASSENGER SIDE
BUMPER ATTACHMENT
5
6
TOOLS REQUIRED
RATCHET
10mm SOCKET
18mm SOCKET - DEEP WELL
3/4" SOCKET
5/16" OPEN END/BOX WRENCH
5/8" OPEN END/BOX WRENCH
11/16" OPEN END/BOX WRENCH
18mm OPEN END/BOX WRENCH
SMALL DISK GRINDER
TORQUE WRENCH
2.000 in
1.125 in
2.000 in
3.250 in
.750 in
1.750 in
TRIM DIAGRAM FOR MINIMAL
FASCIA TRIMMING