
Owners manual

Parts List
DESCRIPTIONPART NUMBERQTYITEM
HEX NUT7/16-1481
HELICAL LOCK WASHER7/16 LOCK WASHER82
CARRIAGE BOLT7/16-14 x 1 1/2
43
SQ. U-BOLT7/16-14 x 1.63 x 2.50 C-C24
HEX BOLT3_8 - 16 x 14
5
HANDLE NUT3_8-16 TAB NUT46
.188 x 4.00 BACKING PLATECM-11823-BP27
GROSS LOAD CAPACITY WHEN USED AS A WEIGHT CARRYING HITCH: LBS. TRAILER WEIGHT & LBS. TONGUE WEIGHT.
***DO NOT EXCEED VEHICLE MANUFACTURER'S RECOMMENDED TOWING CAPACITY.***
WARNING: ALL NON-TRAILER LOADS APPLIED TO THIS PRODUCT MUST BE SUPPORTED BY 18050 STABILIZING STRAPS.
** FAILURE TO PROPERLY SUPPORT NON-TRAILER LOADS WILL VOID PRODUCT WARRANTY**
HAVING INSTALLATION QUESTIONS? CALL TECHNICAL SUPPORT AT 1-800-798-0813
HITCH WEIGHT: LBS.
INSTALL TIME
PROFESSIONAL: MINUTES
NOVICE (DIY): MINUTES
INSTALL NOTES:
INSTALLATION STEPS
PERIODICALLY CHECK THIS RECEIVER HITCH TO ENSURE THAT ALL FASTENERS
ARE TIGHT AND THAT ALL STRUCTURAL COMPONENTS ARE SOUND.
Curt Manufacturing Inc., warrants this product to be free of defects in material and/or workmanship at the time of retail purchase by the original purchaser. If the product is found to be defective,
Curt Manufacturing Inc., may repair or replace the product, at their option, when the product is returned, prepaid, with proof of purchase. Alteration to, misuse of, or improper installation of
this product voids the warranty. Curt Manufacturing Inc.'s liability is limited to repair or replacement of products found to be defective, and specifically excludes liability for incidental or
consequential loss or damage.
2,000 200
24
45
00-04 MERCEDES S-CLASS SEDAN
11/13/2017
11823 / 257248
90
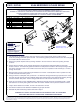
1. This hitch fits up to chassis panels under the vehicle in front of the bumper structure with the hitch
cross tube passing behind the spare tire well. Two reinforcing plates provided connect to the hitch side plates
and install inside the vehicle's trunk.
2. Remove the plastic sill plate and any flooring material in the rear of the tire well area exposing all metal
surfaces.
3. Lift the hitch into position on the vehicle with the driver and passenger side plates fitting to horizontal
chassis surfaces. A vertical body panel fits between the side plates on both the driver and passenger side of
the vehicle. Center the hitch on the vehicle and use the hitch as a template to mark and drill (4) 1/2" holes
through the chassis.
4. With the hitch removed, install rectangular U-bolts in the vehicle. Carefully lift the hitch in position over the
U-bolts and fasten the hitch in place.
5. Using the hitch as a template, drill (4) holes for 7/16" diameter carriage bolts through spare tire well. Inside
the spare tire well, position the CM-11823-BP plates with carriage bolts in the slotted holes passing through
the floor and hitch side plates. Fasten carriage bolts with hex nuts and lock washers as shown.
6. At the (4) round holes in CM-11823-BP plates, drill through the body panel for 3/8" diameter bolts. Install
3/8" fasteners as shown placing bolts from inside the vehicle. Handle nuts are placed outside the vehicle.
7. Torque all 3/8" fasteners to 45 lb-ft, and all 7/16" fasteners to 70 lb-ft.
8. Use silicone sealant to seal hardware installed through spare tire well.
9. Reinstall sill plate and flooring material removed in Step 2.
6
4
5
2
1
3
7
- DRILLING REQUIRED
- TEMPORARILY REMOVE SILL PLATE
- SILICONE SEAL HARDWARE
U-BOLT
INSTALLATION
1 CAPPED YEARS 5/28/2009 CFM
2 CURRENT STYLE 2/16/2010 CJL
3
CHG TO GRADE 8 TORQUE SPECS
11/30/2012
AJP
4 UPDATED TOW RATING 11/13/2017 AGC
REVISION HISTORY
REV DESCRIPTION DATE APPROVED
SPARE TIRE WELL
CHASSIS
DRILL HOLES
DRILL HOLES
DESIGNED FOR USE WITH
BALLMOUNT #55001 / 45501