
Installation Guide


INSTALLATION WALKTHROUGH:
For more information log onto www.curtmfg.com, & for helpful towing tips log onto www.hitchinfo.com
3. Remove the plastic under body panel from the passenger
side and the driver side frame rails. Remove (3) fascia
screws from the passenger side and (4) from the driver
side. Carefully pull down and set aside.
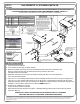
4. Raise hitch into position and secure to the existing
weldnuts with M10-1.25 x 25mm bolts and 7/16"
conical toothed washers. Note: The bumper locator
pin may interfere with the hitch hardware. You may
need to bend or trim it to allow hardware clearance.
5. Insert 1/2-13 x 4 1/2" carriage bolts through the driver side
plate and frame rail, secure using 1/2-13 flange nuts. Insert
1/2-13 x 4 1/2" carriage bolts through the 12113-SP spacer,
in the passenger side frame rail and out the passenger side
plate, secure using 1/2-13 flange nuts.
6. Torque all 1/2" hardware to 110 ft-lbs.
Torque all 10mm hardware to 48 ft-lbs.
Raise exhaust and spare tire back into position.
Reinstall passenger side and driver side under
body panels removed in Step (3).
BUMPER LOCATOR PIN