
Installation Guide


Parts List
DESCRIPTION
PART NUMBER
QTY
ITEM
BOLT, CAR,1/2-13 UNC,4-1/2,GRD8,YZ
10-10297
4
1
NUT,SER-FLANGE,1/2-13 UNC,GRD8,YZ
20-0006242
HHCS,M10X1.25,25,CL10.9,YZ
10-1037343
WASHER, S-CON,7/16,YZ
30-0016344
.188" SPACER PLATE12113-SP
1
5
GROSS LOAD CAPACITY WHEN USED AS A WEIGHT CARRYING HITCH: LBS. TRAILER WEIGHT & LBS. TONGUE WEIGHT.
***DO NOT EXCEED VEHICLE MANUFACTURER'S RECOMMENDED TOWING CAPACITY.***
HAVING INSTALLATION QUESTIONS? CALL TECHNICAL SUPPORT AT 877-287-8634
INSTALLATION STEPS
PERIODICALLY CHECK THIS RECEIVER HITCH TO ENSURE THAT ALL FASTENERS
ARE TIGHT AND THAT ALL STRUCTURAL COMPONENTS ARE SOUND.
Curt Manufacturing LLC., warrants this product to be free of defects in material and/or workmanship at the time of retail purchase by the original purchaser. If the product is found to be defective,
Curt Manufacturing LLC., may repair or replace the product, at their option, when the product is returned, prepaid, with proof of purchase. Alteration to, misuse of, or improper installation of
this product voids the warranty. Curt Manufacturing LLC.'s liability is limited to repair or replacement of products found to be defective, and specifically excludes liability for incidental or
consequential loss or damage.
3500 350
KIA SORENTO & HYUNDAI SANTA FE
8/13/2020
12113
40
27
20
HITCH WEIGHT: LBS.
INSTALL TIME
PROFESSIONAL: MINUTES
NOVICE (DIY): MINUTES
INSTALL NOTES:
39615
1
3
4
2
5
1. Lower and remove spare tire.
2. Lower exhaust by removing (3) rubber isolators.
3. Remove the plastic under body panel from the passenger side and the driver side frame rails.
Remove (3) fascia screws from the passenger side and (4) from the driver side.
Carefully pull down and set aside.
4. Raise hitch into position and secure to the existing weldnuts with M10-1.25 x 25mm bolts and
7/16" conical toothed washers.
5. Insert 1/2-13 x 4 1/2" carriage bolts through the driver side plate and frame rail, secure using 1/2-13 flange nuts.
Insert 1/2-13 x 4 1/2" carriage bolts through the 12113-SP spacer, in the passenger side frame rail and out the
passenger side plate, secure using 1/2-13 flange nuts. Note: The bumper locator pin may interfere with the hitch
hardware. You may need to bend or trim it to allow hardware clearance.
6. Torque all 1/2" hardware to 110 ft-lbs.
Torque all 10mm hardware to 48 ft-lbs.
7. Raise exhaust and spare tire back into position. Reinstall passenger side and driver side under body panels
removed in Step (3).
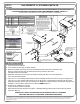
EXISTING WELD NUT
(BOTH SIDES)
DRIVER SIDE
FRAME RAIL
PASSENGER SIDE
FRAME RAIL
BUMPER LOCATOR PIN
(BOTH SIDES)
- NO DRILL
- LOWER SPARE
- LOWER EXHAUST
- LOWER UNDER BODY PANELS
TOOLS REQUIRED
RATCHET
TORQUE WRENCH
6" SOCKET EXTENSION
7/16" SOCKET
3/4" SOCKET
17mm SOCKET
SCREW DRIVER
SAFETY GLASSES
DESIGNED FOR USE WITH
BALLMOUNT #45520/D-20
DESIGNED FOR USE WITH
EURO BALLMOUNT
#45561 (1 7/8" BALL) OR
#45562 (2" BALL)
1 CHANGED WEIGHT RATING FROM 3500/525 TO 3500/350
5/30/2013
AJP
2 UPDATED HARDWARE DESCRIPTIONS/NUMBERS
8/13/2020
CJW
REVISION HISTORY
REV
DESCRIPTION
DATE
APPROVED