
Installation Guide

GROSS LOAD CAPACITY WHEN USED AS A WEIGHT CARRYING HITCH: LBS. TRAILER WEIGHT & LBS. TONGUE WEIGHT.
WARNING: ALL NON-TRAILER LOADS APPLIED TO THIS PRODUCT MUST BE SUPPORTED BY 18050 STABILIZING STRAPS.
HAVING INSTALLATION QUESTIONS? CALL TECHNICAL SUPPORT AT
1-877-287-8634
HITCH WEIGHT: LBS.
INSTALL TIME
PROFESSIONAL: MINUTES
NOVICE (DIY): MINUTES
INSTALL NOTES:
Curt Manufacturing Inc., warrants this product to be free of defects in material and/or workmanship at the time of retail purchase by the original purchaser. If the product is found to be defective,
Curt Manufacturing Inc., may repair or replace the product, at their option, when the product is returned, prepaid, with proof of purchase. Alteration to, misuse of, or improper installation of
this product voids the warranty. Curt Manufacturing Inc.'s liability is limited to repair or replacement of products found to be defective, and specifically excludes liability for incidental or
consequential loss or damage.
4,000 400
22
30
ACURA RDX
11/19/2012
13154
60
-NO DRILLING REQUIRED
Parts List
DESCRIPTION
PART NUMBER
QTY
ITEM
HEX BOLTM12 - 1.25 x 40 HEX21
HEX BOLT1/2 - 13 x 1 1/222
CONICAL TOOTHED WASHER1/2"43
HANDLE NUT1/2-1324
1
3
4
2
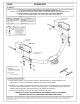
DRIVER SIDE
FRAME RAIL
PASSENGER SIDE
FRAME RAIL
EXISTING WELD NUT
(BOTH SIDES)
1. Raise hitch into position so the slots in the hitch are aligned with the two existing weldnuts in the
vehicle frame. Loosely secure with M12 bolts and 1/2" conical toothed washers.
2. Bend the 1/2-13 handle nut tab and insert it into the access hole in the vehicle frame. Center the handle
nut over the open bolt hole in frame. Use 1/2-13 hex bolts and 1/2" conical toothed washers and insert
hardware through hitch plate and vehicle frame into the handle nut and tighten.
3. Torque all 1/2" hardware to 110 ft-lbs and all M12 hardware to 86 ft-lbs.
INSTALLATION STEPS:
ACCESS HOLE
(BOTH SIDES)