
Installation Guide

Parts List
DESCRIPTIONPART NUMBERQTYITEM
WASHER1/2"121
LOCK WASHER1/2"82
HEX NUT
1/2-13
4
3
HEX BOLT1/2-13 x 1 3/444
HEX NUTM12 - 1.2525
HEX TAP BOLT
M12 - 1.25 x 40 46
11 GA X 1.50" BACKING PLATECM-13196-BP27
PLATE .188" A-36 H.R. CM-13196-BP218
PLATE .188" A-36 H.R. CM-13196-BP319
GROSS LOAD CAPACITY WHEN USED AS A WEIGHT CARRYING HITCH:
LBS. TRAILER WEIGHT & LBS. TONGUE WEIGHT.
GROSS LOAD CAPACITY WHEN USED AS A WEIGHT DISTRIBUTION HITCH:
LBS. TRAILER WEIGHT & LBS. TONGUE WEIGHT
***DO NOT EXCEED VEHICLE MANUFACTURER'S RECOMMENDED TOWING CAPACITY.***
HITCH WEIGHT: LBS.
INSTALL TIME: MINUTES
INSTALL NOTES:
- NO DRILLING REQUIRED
INSTALLATION STEPS
PERIODICALLY CHECK THIS RECEIVER HITCH TO ENSURE THAT ALL FASTENERS
ARE TIGHT AND THAT ALL STRUCTURAL COMPONENTS ARE SOUND.
Curt Manufacturing Inc., warrants this product to be free of defects in material and/or workmanship at the time of retail purchase by the original purchaser. If the product is found to be defective,
Curt Manufacturing Inc., may repair or replace the product, at their option, when the product is returned, prepaid, with proof of purchase. Alteration to, misuse of, or improper installation of
this product voids the warranty. Curt Manufacturing Inc.'s liability is limited to repair or replacement of products found to be defective, and specifically excludes liability for incidental or
consequential loss or damage.
5,000
500
47
45
5,500
550
93-98 TOYOTA T-100
10/19/2012
13196 / 757201
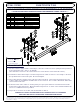
1) For those vehicles equipped with a rear bumper, remove the rearmost fasteners joining the bumper bracket
to the vehicle frame rails. (Hole "1" in diagram.)
(Note: Return the fasteners to the vehicle owner for use if the hitch is removed from the vehicle.)
2) Install frame reinforcement angles as shown using fasteners called out. Choose correct angle so the holes
line up with the holes in the frame plate. Do not final tighten.
3) If the vehicle includes existing screws at the two rearmost locations, remove them and return them to the
vehicles owner for reinstallation should the hitch ever be removed. These vehicles will include 12mm weld
nuts inside the frame rails.
4) Position the hitch on the vehicle as shown, placing one spacer plate between each hitch bracket and the
bottom of the vehicle frame holes. Mount the hitch using fasteners as shown. Those without weldnuts will
have to use additional fasteners provided.
5) Torque all 1/2" fasteners to 110 lb-ft, and all 12mm bolts to 86 lb-ft.
4
1
8
9
1
2
3
5
6
"1"
7
"1"