
Installation Guide
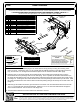

GROSS LOAD CAPACITY WHEN USED AS A WEIGHT CARRYING HITCH: LBS. TRAILER WEIGHT & LBS. TONGUE WEIGHT.
GROSS LOAD CAPACITY WHEN USED AS A WEIGHT DISTRIBUTION HITCH: LBS. TRAILER WEIGHT & LBS. TONGUE WEIGHT
***DO NOT EXCEED VEHICLE MANUFACTURER'S RECOMMENDED TOWING CAPACITY.***
HAVING INSTALLATION QUESTIONS? CALL TECHNICAL SUPPORT AT 1-877-287-8634
INSTALLATION STEPS
PERIODICALLY CHECK THIS RECEIVER HITCH TO ENSURE THAT ALL FASTENERS
ARE TIGHT AND THAT ALL STRUCTURAL COMPONENTS ARE SOUND.
CURT Manufacturing LLC., warrants this product to be free of defects in material and/or workmanship at the time of retail purchase by the original purchaser.
If the product is found to be defective, CURT Manufacturing LLC., may repair or replace the product, at their option, when the product is returned, prepaid,
with proof of purchase. Alteration to, misuse of, or improper installation of this product voids the warranty. CURT Manufacturing LLC.'s liability is limited to
repair or replacement of products found to be defective, and specifically excludes liability for incidental or consequential loss or damage.
6,000 750
7,500
750
RAM Promaster
5/15/2020
13207
40
60
20
HITCH WEIGHT:
LBS.
INSTALL TIME
PROFESSIONAL: MINUTES
NOVICE (DIY): MINUTES
INSTALL NOTES:
Scan
for more
information
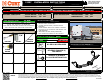
Parts List
DESCRIPTIONPART NUMBERQTYITEM
BOLT,CAR,9/16-12 UNC,2-1/2,GRD8,YZ
10-1045511
BOLT,CAR,9/16-12 UNC,2,GRD8,YZ
10-1032912
.313 x 1.00 x 2.50" 9/16" SQUARE HOLE SPACERCM-SP70
23
NUT,SER-FLANGE,9/16-12 UNC,GRD8,YZ20-0010424
9/16" FISHWIRE9_16 FISHWIRE2
5
NUT,HANDLE,1/2-13 UNC,GRD8,CZ20-0017426
HHCS,1/2-13 UNC,5-1/2,GRD8,YZ10-102952
7
WASHER,FLAT,1/2,YZ30-0013328
HHCS,1/2-13 UNC,1-1/2,GRD8,YZ
10-1033429
WASHER,S-CON,1/2,YZ
30-00149210
NUT,SER-FLANGE,1/2-13 UNC,GRD8,YZ
20-00062211
.625 x 2.00 SPACER13207-SP
112
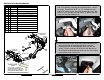
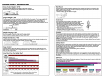
1. Remove the rearwardmost rubber plugs in the frame rails and foil (if present) covering the mounting holes.
Return to owner. Fishwire the 9/16" x 2 1/2" carriage bolt and CM-SP70 spacer on the side with the recovery
loop, and the 9/16" x 2" carriage bolt and CM-SP70 spacer into the holes that had the rubber plugs.
2. Raise the hitch on the driver side with the forwardmost tab over the leaf spring and angle hitch to get the
forwardmost tab on the passenger side over the leaf spring. Once in position, lift the driver side bracket up to
the frame rail and slide the hitch over the rear bumper stud and the inner frame stud, loosely secure with a 9/16"
hex flange nut. Pushing the hitch toward the driver side, raise the passenger side bracket up to the frame. Slide
the 13207-SP between the hitch and the frame with the bolt passing through and loosely secure with a 9/16" hex
flange nut.
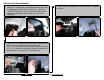
3. Slide the (2) 1/2" handle nuts into the grooved section of the frame over the forwardmost tabs and secure with
1/2" x 1 1/2" hex bolts and conical tooth washers. Slide the 1/2" x 5 1/2" hex bolts with washers through the
frame and hitch brackets. Secure with 1/2" hex flange nuts.
4. Torque all 9/16" fasteners to 150 lb-ft and all 1/2" fasteners to 110 lb-ft.
1
3
12
6
10
9
5
11
8
7
4
2
PASSENGER SIDE
FRAME RAIL
DRIVER SIDE
FRAME RAIL
EXHAUST PIPE
SPRING SHCKLE
MOUNT
- REMOVE RUBBER PLUGS
- REVERSE FISHWIRE
- NO DRILLING
TOOLS REQUIRED
RATCHET
TORQUE WRENCH
3/4" SOCKET
7/8" SOCKET
SMALL SCREW DRIVER