
Installation Guide


Parts List
DESCRIPTION
PART NUMBER
QTY
ITEM
.188 x 1.00 x 3.00" SQUARE HOLE SPACERCM-SP4031
BOLT,CAR,1/2-13 UNC,1-3/4,GRD8,YZ10-1027232
HHCS,M12x1.75,40,CL10.9,YZ10-1038613
WASHER,S-CON,1/2,YZ
30-0014914
1/2" FISHWIRE1_2 FISHWIRE
35
NUT, SER-FLANGE,1/2-13 UNC,GRD8,YZ
20-0006236
INSTALLATION WALKTHROUGH:
For more information log onto www.curtmfg.com, & for helpful towing tips log onto www.hitchinfo.com
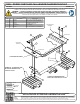
1. Locate and remove (2) exhaust isolators near muffler on
driver and passenger side of vehicle. Save bolts for
reinstallation.
2. Locate and remove (2) rubber isolators from exhaust pipe.
5
1
2
4
3
EXISTING WELDNUT
LOWER PASSENGER
SIDE EXHAUST
REMOVE DRIVER
SIDE EXHUAST
DRIVER SIDE
FRAME
PASSENGER
SIDE FRAME
ACCESS HOLE
ACCESS HOLE
6
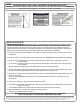
NOTE:
FOR VEHICLES WITH WELDED EXHAUST, FASCIA REMOVAL MAY EASE INSTALLATION
Remove the plastic push pins holding the wheel well liner to fascia (each side). Pull back wheel
well liner to access the hidden screw and remove using 10mm socket on each side. Remove the
remaining screws and plastic push pins along the bottom of the fascia including the nuts holding
the underbody panel to the trunk pan. Gently remove the fascia and unplug wiring. Set bumper
fascia aside for later reinstallation.