
Installation Guide


INSTALLATION WALKTHROUGH:
For more information log onto www.curtmfg.com
Parts List
DESCRIPTIONPART NUMBERQTYITEM
BOLT,CAR,1/2-13 UNC,1-1/4,GRD8,YZ10-1027821
NUT, SER-FLANGE,1/2-13 UNC,GRD8,YZ20-0006222
FB,M10x1.25,30,CL10.9,YZ10-10279
4
3
.250 x 1.00 x 3.00" SQUARE HOLE SPACERCM-SP6
24
1/2" FISHWIRE1_2 FISHWIRE2
5
4
1
3
1. Open the rear vehicle doors to expose the bumper cover
and fasteners. Using a T30 torxbit, remove (8) fasteners
and the bumper cover. Note: If present, disconnect the
rear back-up sensor before completely removing the
bumper cover.
2. Remove (2) M10 bolts and (1) M10 nut securing the
bumper beam to the end of the frame, both sides.
Note: Remove M10 bolts with a 16mm socket
and M10 nuts using a 15mm socket.
h
h
h
h
h
h
h
h
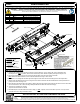
BUMPER COVER
BUMPER BEAM
REAR OF VEHICLE
5
2