
Installation Manual

Parts List
DESCRIPTIONPART NUMBERQTYITEM
.188 x 1.50 x 2.00" ROUND HOLE SPACERCM-SP32
41
HEX BOLT
M12 - 1.25 x 40 HEX42
CONICAL TOOTHED WASHER1/2"
43
GROSS LOAD CAPACITY WHEN USED AS A WEIGHT CARRYING HITCH: LBS. TRAILER WEIGHT & LBS. TONGUE WEIGHT.
GROSS LOAD CAPACITY WHEN USED AS A WEIGHT DISTRIBUTION HITCH: LBS. TRAILER WEIGHT & LBS. TONGUE WEIGHT
***DO NOT EXCEED VEHICLE MANUFACTURER'S RECOMMENDED TOWING CAPACITY.***
HAVING INSTALLATION QUESTIONS? CALL TECHNICAL SUPPORT AT 1-800-798-0813
INSTALLATION STEPS
PERIODICALLY CHECK THIS RECEIVER HITCH TO ENSURE THAT ALL FASTENERS
ARE TIGHT AND THAT ALL STRUCTURAL COMPONENTS ARE SOUND.
Curt Manufacturing Inc., warrants this product to be free of defects in material and/or workmanship at the time of retail purchase by the original purchaser. If the product is found to be defective,
Curt Manufacturing Inc., may repair or replace the product, at their option, when the product is returned, prepaid, with proof of purchase. Alteration to, misuse of, or improper installation of
this product voids the warranty. Curt Manufacturing Inc.'s liability is limited to repair or replacement of products found to be defective, and specifically excludes liability for incidental or
consequential loss or damage.
5,000 500
5,500
550
TOYOTA TACOMA / X RUNNER
11/9/2009
13323
120
46
60
HITCH WEIGHT:
LBS.
INSTALL TIME
PROFESSIONAL: MINUTES
NOVICE (DIY): MINUTES
INSTALL NOTES:
757323
- BUMPER REMOVAL
- NO DRILLING REQUIRED
- TEMP. REMOVE X FRAME SUPPORT
* If bumper alignment pin interferes with hitch installation, use a saw or cutoff wheel to remove the
alignment pin from the side bracket.
CAUTION: Support the bumper to keep it from dropping down during the hitch installation.
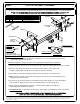
1) Remove (2) hex bolts from each of the bumper brackets and replace with supplied fasteners as shown.
2) Raise the hitch into position between the bumper brackets and the vehicle frame rails.
Install the supplied bolts through the hitch and up into the frame weldnuts.
3) Reinstall the factory bolts through the bumper brackets, hitch plates and into the frame.
4) With the bumper supported remove two existing hex bolts from one side of the bumper bracket
and bumper structure as shown.
5) Insert two (2) spacer blocks between the bumper bracket and the bumper as shown. Reinstall the
bolts through the bumper bracket, spacer and into the bumper structure.( Both sides)
6)Torque supplied 12mm hardware to 65 ft-lbs, existing 12mm hardware to 65 ft-lbs and
and existing 10mm hardware to 36 ft-lbs.
7) For X-Runner only:
Temporarily remove X frame support bracket for installation, replace after hitch is
fully installed.
FRAME RAIL
BUMPER BRACKET
USE EXISTING
M12 BOLTS
(BOTH SIDES)
FRAME RAIL
EXISTING WELDNUTS
IN FRAME
LOOSEN (3) BOLTS
TO SUPPORT BUMPER
DURING INSTALLATION
REMOVE (2) BOLTS
(BOTH SIDES)
3
2
1