
Installation Guide


GROSS LOAD CAPACITY WHEN USED AS A WEIGHT CARRYING HITCH: LBS. TRAILER WEIGHT & LBS. TONGUE WEIGHT.
GROSS LOAD CAPACITY WHEN USED AS A WEIGHT DISTRIBUTION HITCH: LBS. TRAILER WEIGHT & LBS. TONGUE WEIGHT
WARNING: *** DO NOT EXCEED VEHICLE MANUFACTURER'S RECOMMENDED TOWING CAPACITY. ***
FOR MORE INFORMATION LOG ONTO WWW.CURTMFG.COM
HAVING INSTALLATION QUESTIONS? CALL TECHNICAL SUPPORT AT 1-877-287-8634
INSTALLATION STEPS
PERIODICALLY CHECK THIS RECEIVER HITCH TO ENSURE THAT ALL FASTENERS
ARE TIGHT AND THAT ALL STRUCTURAL COMPONENTS ARE SOUND.
CURT Manufacturing LLC., warrants this product to be free of defects in material and/or workmanship at the time of retail purchase by the original purchaser.
If the product is found to be defective, CURT Manufacturing LLC., may repair or replace the product, at their option, when the product is returned, prepaid,
with proof of purchase. Alteration to, misuse of, or improper installation of this product voids the warranty. CURT Manufacturing LLC.'s liability is limited to
repair or replacement of products found to be defective, and specifically excludes liability for incidental or consequential loss or damage.
This product complies with safety specifications and requirements for connecting devices and towing systems of the state of New York, V.E.S.C.Regulation V-5 and SAE J684.
5,000 750
6,000
750
HYUNDAI PALISADE
07/06/2020
13427
90
39
45
HITCH WEIGHT: LBS.
INSTALL TIME
PROFESSIONAL: MINUTES
NOVICE (DIY): MINUTES
INSTALL NOTES:
Scan
for more
information
Parts List
DESCRIPTIONPART NUMBERQTYITEM
HHCS,M10x1.25,30,CL10.9,YZ10-1027141
HHCS,M12x1.75,120,CL10.9,YZ
10-1028342
NUT, HEX,M12x1.75,CL10,YZ
20-0013643
WASHER, S-CON,1/2,YZ30-0014984
WASHER,S-CON,7/16,YZ30-001634
5
2
4
4
3
5
1
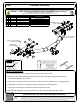
PASSENGER SIDE
FRAME RAIL
DRIVER SIDE
FRAME RAIL
EXISTING TUBE SPACERS
IN VEHICLE FRAME
INSTALL INTO EXISTING
VEHICLE WELDNUTS
1. Lower spare tire with 11mm socket and ratchet. Place spare off to the side.
2. Remove the driver side underbody panel by removing (3) push clips and turning (2) plastic retainers
counterclockwise with a 14mm socket.
3. Unhook the (4) rearward most exhaust isolators to lower the exhaust. NOTE: be sure to support exhaust.
4. Raise hitch into position over exhaust and loosely install fasteners as shown above.
5. Torque all 12mm fasteners to 79 lb-ft and all 10mm fasteners to 48 lb-ft.
6. Reinstall underbody panel, raise spare tire back into position and reinstall the exhaust isolators.
- NO DRILLING REQUIRED
- LOWER EXHAUST
- TEMPORARILY REMOVE
UNDERBODY PANEL
TOOLS REQUIRED
RATCHET
TORQUE WRENCH
6" SOCKET EXTENSION
11mm, 14mm, 17mm, 19mm SOCKETS
STRAIGHT SCREW DRIVER
19mm BOXED END WRENCH
SAFETY GLASSES