
Installation Guide

Parts List
DESCRIPTIONPART NUMBERQTYITEM
BOLT,CAR,1/2-13 UNC,2,GRD8,YZ
10-1028841
BOLT,CAR,9/16-12 UNC,1-3/4,GRD8,YZ
10-1032822
NUT, SER-FLANGE,1/2-13 UNC,GRD8,YZ20-0006243
NUT,SER-FLANGE,9/16-12 UNC,GRD8,YZ20-0010424
.250 x 1.50 x 2.00" SQUARE HOLE SPACERCM-SP166
.313 x 1.50 x 2.00" 9/16" SQUARE HOLE SPACERCM-SP712
7
1/2" FISHWIRE1_2 FISHWIRE48
9/16" FISHWIRE9_16 FISHWIRE29
GROSS LOAD CAPACITY WHEN USED AS A WEIGHT CARRYING HITCH: LBS. TRAILER WEIGHT & LBS. TONGUE WEIGHT.
GROSS LOAD CAPACITY WHEN USED AS A WEIGHT DISTRIBUTION HITCH: LBS. TRAILER WEIGHT & LBS. TONGUE WEIGHT
***DO NOT EXCEED VEHICLE MANUFACTURER'S RECOMMENDED TOWING CAPACITY.***
HAVING INSTALLATION QUESTIONS? CALL TECHNICAL SUPPORT AT
1-877-287-8634
INSTALLATION STEPS
PERIODICALLY CHECK THIS RECEIVER HITCH TO ENSURE THAT ALL FASTENERS
ARE TIGHT AND THAT ALL STRUCTURAL COMPONENTS ARE SOUND.
Curt Manufacturing LLC., warrants this product to be free of defects in material and/or workmanship at the time of retail purchase by the original purchaser. If the product is found to be defective,
Curt Manufacturing LLC., may repair or replace the product, at their option, when the product is returned, prepaid, with proof of purchase. Alteration to, misuse of, or improper installation of
this product voids the warranty. Curt Manufacturing LLC.'s liability is limited to repair or replacement of products found to be defective, and specifically excludes liability for incidental or
consequential loss or damage.
16,000 2,400
17,000 2,400
07/07/2020
15300
60
52
30
HITCH WEIGHT: LBS.
INSTALL TIME
PROFESSIONAL: MINUTES
NOVICE (DIY): MINUTES
INSTALL NOTES:
1
6
3
- DRILLING MAY BE REQUIRED
- FISHWIRE HARDWARE
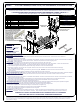
DRIVER SIDE
FRAME RAIL
EXISTING HOLES WILL VARY
WITH MODEL YEARS
1973-92 FORD: Lower the spare tire-
1. Using the large hole in the hitch as a guide, place this slot over the stock rivet on each side of frame. Center the hitch on the frame and
mark the six holes which must be drilled.
2. Drill the two rearmost holes in the frame to accommodate 9/16" hardware. Drill the four forward-most holes in the frame to accommodate 1/2" hardware.
Place proper bolts and spacers in the frame rails, as shown. Raise hitch into position and secure using flange nuts.
1993-97 FORD: Lower the spare tire-
1. Use the large slot in the hitch as a guide, place this slot over the stock rivet on each side of the frame.
2. Note that on some models the rear most holes in the hitch will line up with the small 1/4" holes in the vehicle frame. If this is the case drill these
holes out to accommodate 9/16" hardware. If no holes are present follow the instructions for 1973-92 Ford.
3. Place a 9/16" carriage bolt and square hole spacer down through the frame in each of the drilled out holes.
4. Raise hitch into position, still using the rivet as a guide. Raise the hitch over the bolts on the vehicle frame and secure with flange
nuts. Hand tighten only at this time.
5. Center the hitch and drill the remaining 1/2" holes using the hitch as a guide. CAUTION: This hitch must have 3 bolts on each side or
failure may result.
6. Place 1/2" carriage bolts and square hole spacers in remaining holes and secure with a flange nuts.
1978-97 FORD BRONCO FULL SIZE: Note: If the bumper interferes with the receiver hitch, loosen the bumper brackets and reposition upward and retighten.
1. Using the large slot in the hitch as a guide, place this slot over the stock rivet on each side of the frame. Center the hitch on the frame
and mark the six holes to be drilled.
2. Drill the two rearmost holes in the frame to accommodate 9/16" hardware. Drill the four forward-most holes in the frame to accommodate 1/2" hardware,
take extra care around the gas tank.
3. A carriage bolt and square hole spacer must be placed in each hole. Because of the tight clearance with the gas tank the two forward
holes on each side must be fishwired. Feed the bolts through the frame access hole located next to the cross member.
4. Raise the hitch back into position and secure each bolt with a flange nut.
1967-02 DODGE FULL SIZE: Note: If the bumper interferes with the receiver hitch, loosen the bumper brackets and reposition upward and retighten.
1. At the rear of the frame find the 1/2" round holes and enlarge holes to accommodate 9/16" hardware.
2. Place a 9/16" carriage bolt and square hole spacer down through the frame in each of the enlarged holes.
3. Raise hitch into position and secure with 9/16" flange nuts on each bolt, hand tighten only.
4. Center hitch and use as a template to drill remaining holes to accommodate 1/2" hardware.
5. Place a 1/2" carriage bolts and square hole spacers in all mounting holes.
6. Secure each bolt with a flange nut.
ALL MODELS: Due to the large size of the middle mounting hole, a square hole spacer must be placed between the hitch and the flange nut at
that location. Torque all 1/2" hardware to 110 ft-lbs. Torque all 9/16" hardware to 130 ft-lbs. Reposition spare tire if necessary.
73-97 FORD F-SERIES (OLD BODY STYLE), 78-97 FORD BRONCO, 67-02 DODGE FULL SIZE
2
4
7
PASSENGER SIDE
FRAME RAIL
TOOLS REQUIRED
TORQUE WRENCH
RATCHET
9" EXTENSION
DRILL
CENTER PUNCH
SOCKET 3/4"
SOCKET 7/8"
SAFETY GLASSES
8
9