
Installation Guide

GM MODEL W/ FUEL TANK SHIELD
***DO NOT EXCEED VEHICLE MANUFACTURER'S RECOMMENDED TOWING CAPACITY.***
HAVING INSTALLATION QUESTIONS? CALL TECHNICAL SUPPORT AT
1-877-287-8634
PERIODICALLY CHECK THIS RECEIVER HITCH TO ENSURE THAT ALL FASTENERS
ARE TIGHT AND THAT ALL STRUCTURAL COMPONENTS ARE SOUND.
Curt Manufacturing Inc., warrants this product to be free of defects in material and/or workmanship at the time of retail purchase by the original purchaser. If the product is found to be defective,
Curt Manufacturing Inc., may repair or replace the product, at their option, when the product is returned, prepaid, with proof of purchase. Alteration to, misuse of, or improper installation of
this product voids the warranty. Curt Manufacturing Inc.'s liability is limited to repair or replacement of products found to be defective, and specifically excludes liability for incidental or
consequential loss or damage.
15800
2001-PRESENT CHEVROLET SILVERADO 3500 HD CAB & CHASSIS w/34" WIDE FRAMES
2001-PRESENT GMC SIERRA 3500 HD CAB & CHASSIS w/34" WIDE FRAMES
2007-PRESENT DODGE RAM 3500 HD CAB & CHASSIS w/34" WIDE FRAMES
2008-PRESENT DODGE RAM 4500/5500 HD CAB & CHASSIS w/34" WIDE FRAMES
INSTALLATION STEPS
DODGE CHASSIS CAB
1. If present, remove the temporary license plate bracket, return bracket & hardware to owner.
2. Remove rear-most rivet on bottom of frame rail, each side. Rivet location will be enlarged in Step 3.
3. Raise hitch into position, place rear edges of horizontal flanges flush with end of frame rails and clamp
to frame rail.
4. Using hitch as a template, drill 3 holes on each side as shown.
5. Install M16 hex flange bolt through holes drilled in frame rails and out hitch side plates.
Secure with M16 flat washers, lock washers and hex nuts.
6. Torque all M16 hardware to 195 ft-lbs.
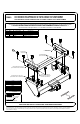
CHEVROLET/GMC CAB & CHASSIS
1. The following steps will need to be performed on select GM models;
a. Remove the temporary license plate bracket, return bracket & hardware to owner.
b. Remove the (2) rear-most fuel tank shield bolts from the frame rail, return hardware to owner.
Note: Support fuel tank shield as necessary.
c. Remove the rear-most rivet on the bottom of the frame rail approximately 3-1/2" from the end
of the frame rails, this rivet aligns with the rear-most holes in the hitch.
2. Raise hitch into position by aligning; (choose option that fits your application)
a. 1" diameter slot with the rivet on the bottom of the frame rail, on each side and clamp in place.
b. the rear-most rivet removed in Step (1c) and the existing holes in Step (1b) and clamp in place.
Note: The hitch side plates will slide between the frame rail and fuel tank shield.
3. Using hitch as a template, drill or enlarge 3 holes on each side as shown.
Note: This includes the holes in the fuel tank shield tab.
4. Install M16 hex flange bolt through holes drilled in frame rails and out hitch side plates.
Secure with M16 flat washers, lock washers and hex nuts. Note: The hitch side plate will be
sandwiched between the fuel tank shield and the frame rail.
5. Torque all M16 hardware to 195 ft-lbs.
CROSS MEMBER
FUEL TANK SHIELD TAB
(SELECT GM MODELS)
FRAME RAIL