
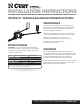
Installation Manual
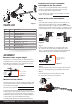

Wide channel bracket
Narrow channel brackets
Install the spring bars
Secure the two spring bars (#3) with the supplied pins (#10).
Attaching the trailer to the ball
Using the trailer tongue jack, lower coupler onto the trailer
ball and close coupler latch. Do not retract jack fully at this
time. Allow the jack to support some of the tongue weight.
Raise the front of the trailer and back of the tow vehicle
approximately 3" with tongue jack. This will allow easier
installation of the spring bars onto the support brackets.
Installing the spring bar support brackets
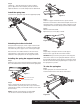
To raise the spring bar
Step 1
Mark the position of the support brackets by making a center
line on the trailer A-frame 4" in from the end of the spring bars.
Step 1
Pull the spring bar out from the A-frame and
hook the lift bar into the L-bracket as shown below.
Step 3
Slide the L-support in between the two captive channel
brackets as shown above. Set the bracket height closest to the
spring bar position set with the jack earlier. Install the second
carriage bolt in the first hole directly below the trailer A-frame.
Step 4
With the L-bracket installed,
tighten both nylock nuts (#8) to 25 ftlbs.
Step 5
Repeat Steps 1 through 4 with the second support
bracket on the opposite side of the trailer A-frame.
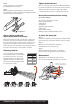
WARNING: Keep clear of the pivot path of all moving parts
when there is tension on the spring bar. Maintain control of
the lift handle at all times when raising or lowering the spring
bar. Be sure that the locking clip and hair pin is in place once
the spring bar is in position.
Step 2
Place a carriage bolt through the top hole on all three
channel brackets, spin the nylock nut loosely onto the bolt,
and hang the assembly over the trailer A-frame on the center
line from Step 1.
NOTE: The wide channel bracket should installed
over the narrow channel as detailed in Figure 7.
Figure 6
Figure 7
Figure 10
Figure 8
Figure 9
Step 6
Tighten 3/4" - 10 bolts (#7, #9) just enough to hold the
spacers (#6) into the hitch head (#1). These bolts will be
tightened after the correct tilt setting has been determined.
PAGE 3 • 17500-INS-RA • 1.800.798.0813 • NEED ASSISTANCE? • CURTMFG.COM