
Installation Guide

CURTMFG.COM
•
PRODUCT SUPPORT: 877.287.8634
•
17501-INS-RD
•
12/08/2021
•
ECN8701
•
PAGE 4
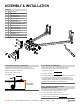
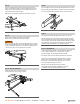
Step 4 - Install the shank, hitch head and ball
Insert the adjustable shank (#2) into the receiver tube on the tow
vehicle and secure with the provided hitch pin & clip (#11). Note: To
obtain the proper ball height on high-ground-clearance vehicles, the
shank may be inverted as shown below. If the shank is used in the
inverted position, check for adequate ground clearance.
Step 8 - Install the spring bars
Secure the two spring bars (#3) with the wire lock lynch pins (#9).
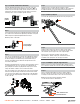
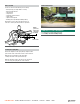
Step 11
Place a carriage bolt through the top hole on all three support
brackets. Spin the nylock nut loosely onto the bolt and hang the
assembly over the trailer A-frame on the center line from Step 10.
Note: The wide channel bracket should be installed
over the narrow channel as detailed below.
Step 5
Position the hitch head (#1) on the adjustable shank (#2). Slide the head
up or down to the nearest bolt hole alignment position that corresponds
with the target uncoupled ball height determined in Step 3.
Mark the position on the shank.
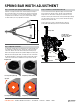
Step 6
Place the 1/2" flat washers (#13) over the short adjustment rod (#11).
Insert a 3/4" hex bolt (#6) through a 3/4" conical washer (#7). Hold
the hitch head (#1) on the shank at the position marked in Step 5.
Insert the assembled hex bolt and washer through the lower hole
in the hitch head channel.
Rotate the head forward as far as it will go. The ball should be vertical
or tilted slightly back. If it is not, remove the short adjustment rod
(#11) and replace it with the long adjustment rod (#12). You can also
change the number of washers on the rod and reassemble.
Place the remaining 3/4" conical washer (#7) on the 3/4" hex bolt (#6)
and insert it through the upper slotted hole in the hitch head. Install
a second 3/4" conical washer (#7) on both hex bolts. Start threading
the 3/4" nylock nuts (#8) and tighten until the head is snug and does
not tilt on its own.
Step 7
Tighten the 3/4"-10 hex bolts (#6) just enough to hold the
adjustment rods (#11, #12) into the hitch head (#1). These bolts will
be tightened after the correct tilt setting has been determined.
Step 9
Using the trailer tongue jack, lower the coupler onto the trailer
ball and close the coupler latch. Do not retract the jack fully at this
time. Allow the jack to support some of the tongue weight.
Raise the front of the trailer and back of the tow vehicle
approximately 3" with the tongue jack. This will allow easier
installation of the spring bars onto the support brackets.
Step 10 - Installing the spring bar support brackets
Mark the position of the support brackets (#4) by making a center
line on the trailer A-frame 4" in from the end of the spring bars (#3).
Upright
position
Inverted
position
Closest position
to target height
Wide channel bracket
Narrow channel bracket
11
12
13
8
7
7
6
2
1