
Installation Guide


11
1
6
5
8
2
7
20
17
18
19
16
15
10
9
4
3
12
14
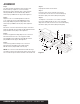
Tube must be
ush with top of
plate for correct
assembly
13
12
Figure 1
ASSEMBLY
Step 1
Lay down the bottom platforms (#4). The tube must
be flush with top of plate for correct assembly.
Mount three support brackets (#3) on each platform
half (#4) with M6*35 hex head bolts (#11), M6 flat
washers (#2) and M6 locknuts (#1) to 80% tightness.
Step 2
Align the holes on assembled platforms with the
1 1/4" shank (#9). Secure with M10*60 hex head
bolts (#10), M10 spring washers (#6), M10*1.5 flat
washers (#7) and M10 locknuts (#5) to 80% tightness.
Step 3
Mount the connection tube brackets (#15) to the bottom
platforms with M8*35 hex head bolts (#8), M8 flat washers
(#14) and M8 locknuts (#13) to 80% tightness.
Step 4
Insert the top platform tubing (#12) into the connection
tube brackets and secure to the support brackets
(#3) with M6*35 hex head bolts (#11), M6 flat washers
(#2) and M6 locknuts (#1) to 80% tightness.
Step 5
Secure the top platform tubing to the connection
tube brackets using M8*35 hex head bolts (#8),
M8 flat washers (#14) and M8 locknuts (#13).
NOTE: The connection tube bracket with reflective tape
should be located on the side facing away from the vehicle.
The one without tape should be located on the shank side.
Step 6
Fully tighten all bolts and locknuts.
Step 7
Insert the cargo carrier shank into the vehicle's
receiver tube. Secure with 1/2" hex head bolt (#17),
flat washer (#18), star washer (#19) and clip (#16).
Step 6
To adapt the 1 1/4" shank to a 2" shank, assemble
the U-type adapter (#20) onto the 1 1/4" shank (#9).
Align the holes and secure with 1/2" hex head bolt (#17),
flat washer (#18), star washer (#19) and clip (#16).
CURTMFG.COM • NEED ASSISTANCE? • 1.800.798.0813 • 18145-INS-RA • PAGE 2