
Installation Guide

CURTMFG.COM
•
PRODUCT SUPPORT: 877.287.8634
•
18151-INS-RC
•
04/16/2021
•
ECN8300
•
PAGE 2
AS SE MBLY
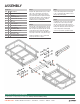
Parts List
Item Qty Description
1 2 Platform frame, half
2 1 Shank, 2"
3 2 Connecting plate
4 1 Folding shank assembly
5 1 Clip
6 1 Pin, 5/8"
7 1 Lock nut, M16
8 1 Hex bolt, M16 x 80mm
9 2 Lock nut, M12
10 2 Flat washer, M12
11 2 Hex bolt, M12 x 75mm
12 8 Lock nut, M10
13 8 Flat washer, M10
14 8 Carriage bolt, M10 x 20mm
Step 1
Align the two platform halves (#1) on either
side of the 2" shank (#2). Insert the two
M12 hex bolts (#11) through the platform
(#1), shank (#2) and other platform half (#1).
Install M12 flat washers (#10) and M12 lock
nuts (#9) on the hex bolts (#11). Snug the
hardware, but do not fully tighten.
Step 3
Connect the folding shank assembly (#4)
to the 2" shank (#2) with an M16 hex bolt
(#8), pin (#6) and clip (#5).
Step 4
To adjust the cargo carrier to the upright,
folded position, remove the pin and clip
(#5, #6). Lift the frame body up until it is
in the vertical position. Reinsert the pin (#6)
through the shank (#2) and the lower hole
of the folding shank assembly (#4).
Secure the pin with the provided clip (#5).
Step 2
Place the two connecting plates (#3) onto the
front and back of the platforms (#1). Insert the
M10 carriage bolts (#14) through the outside
of the platforms (#1) followed by the M10
flat washers (#13) and secure with M10 lock
nuts (#12) to the inside of the platforms (#1).
Tighten all hardware to the recommended
torque specifications on page 1.
10
11
12
13
14
9
8
7
6
5
4
3
2
1
1
TOWING BASICS & SAFETY INFORMATION
For information on safely towing your trailer, visit curtmfg.com/understanding-towing.