
Installation Guide


GROSS LOAD CAPACITY WHEN USED AS A WEIGHT CARRYING HITCH: LBS. TRAILER WEIGHT & LBS. TONGUE WEIGHT.
GROSS LOAD CAPACITY WHEN USED AS A STRAIGHT LINE PULL: 9,000 LBS. MAX. LINE PULL.
WARNING: *** DO NOT EXCEED VEHICLE MANUFACTURER'S RECOMMENDED TOWING CAPACITY. ***
FOR MORE INFORMATION LOG ONTO WWW.CURTMFG.COM & FOR HELPFUL TOWING TIPS LOG ONTO WWW.HITCHINFO.COM
HAVING INSTALLATION QUESTIONS? CALL TECHNICAL SUPPORT AT 1-877-287-8634
INSTALLATION STEPS
PERIODICALLY CHECK THIS RECEIVER HITCH TO ENSURE THAT ALL FASTENERS
ARE TIGHT AND THAT ALL STRUCTURAL COMPONENTS ARE SOUND.
CURT Manufacturing LLC., warrants this product to be free of defects in material and/or workmanship at the time of retail purchase by the original purchaser.
If the product is found to be defective, CURT Manufacturing LLC., may repair or replace the product, at their option, when the product is returned, prepaid,
with proof of purchase. Alteration to, misuse of, or improper installation of this product voids the warranty. CURT Manufacturing LLC.'s liability is limited to
repair or replacement of products found to be defective, and specifically excludes liability for incidental or consequential loss or damage.
This product complies with safety specifications and requirements for connecting devices and towing systems of the state of New York, V.E.S.C.Regulation V-5 and SAE J684.
5,000 500
FORD SUPER DUTY
6/17/2020
31078
60
32
30
HITCH WEIGHT:
LBS.
INSTALL TIME
PROFESSIONAL: MINUTES
NOVICE (DIY): MINUTES
INSTALL NOTES:
Scan
for more
information
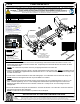
Parts List
DESCRIPTIONPART NUMBERQTYITEM
.250 x 1.00 x 2.50" SQUARE HOLE SPACERCM-SP10
61
NUT,SER-FLANGE,1/2-13 UNC,GRD8,YZ
20-0006262
1/2" FISHWIRE1_2 FISHWIRE63
BOLT,CAR,1/2-13 UNC,1-3/4,GRD8,YZ10-1027264
EXISTING BOLT PLATE
(BOTH SIDES)
USE SUPPLIED CARRIAGE BOLTS,
SPACERS AND NUTS IF BOLT
PLATES ARE NOT PRESENT
1
4
2
3
PASSENGER SIDE
FRAME RAIL
DRIVER SIDE
FRAME RAIL
TRIM DIAGRAM
4"
CENTER OF VEHICLE
3.5"
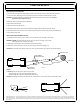
TOOLS REQUIRED
RATCHET
SAFETY GLASSES
3/4" & 18mm SOCKET
TORQUE WRENCH
ROTARY TOOL
MASKING TAPE
TAPE MEASURE
FISHWIRE HARDWARE
REMOVE FASCIA BRACKETS
(SOME MODELS)
FASCIA TRIMMING REQUIRED
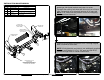
1. Use 18mm socket and ratchet to remove driver and passenger side fascia brackets and return to owner. The
existing bolt plates will fall out in front of frame rails. Temporarily move electrical harness off of frame rail. Save
nuts for installation later.
NOTE:
If oil cooler lines are present remove by unclipping attachment from frame rail.
2. Fishwire (2) bolt plates removed in STEP 1 through original holes inside of frame rails. NOTE:
If bolt plates are not
present, use additionally supplied fasteners and fishwire 1/2-13 x 1 3/4" bolts and CM-SP10 spacers through holes
on inside of frame rails.
3. Locate center of vehicle and mark trim area with making tape. Cut marked trim area on fascia with rotary tool.
NOTE:
Dimensions are approximate and may be modified for an ideal fit.
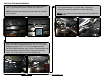
4. Raise side plates into position and loosely secure (4) hex flange nuts onto existing bolt plates or 1/2-13 x 1 3/4"
bolts. Fishwire supplied (2) 1/2-13 x 1 3/4" carriage bolts and CM-SP10 spacers through front of driver and
passenger side frame rails and out slot on bottom of frame rail. Loosely secure 1/2-13 hex flange nuts onto
carriage bolts.
5. Secure all hardware and torque all 1/2" hardware to 110 ft-lbs and all M12-1.75 to 86 ft-lbs. Reconnect electrical
harness through hole in driver side plate.
NOTE:
If cooler lines are present attach to provided hole on side plate.
WIRE HARNESS
MOUNTING HOLE
(BOTH SIDES)
COOLER LINE
MOUNTING HOLE
(BOTH SIDES)