
Installation Guide


Parts List
DESCRIPTIONPART NUMBERQTYITEM
BOLT,CAR,1/2-13 UNC,1-1/4,GRD8,YZ10-1027821
BOLT,CAR,7/16-14 UNC,1-1/4,GRD8,YZ10-1028182
BOLT,CAR,1/2-13 UNC,4,GRD5,CZ10-10308
4
3
NUT, SER-FLANGE,1/2-13 UNC,GRD8,YZ20-0006224
NUT,SER-FLANGE,7/16-14 UNC,GRD8,YZ20-0010385
NUT,SER-FLANGE,1/2-13 UNC,GRD5,CZ
20-0016546
.250 x 1.25 x 2.00" SQUARE HOLE SPACERCM-SP3
27
.250 x 1.50 x 3.00" SQUARE HOLE SPACERCM-SP448
GROSS LOAD CAPACITY WHEN USED AS A WEIGHT CARRYING HITCH: LBS. TRAILER WEIGHT & LBS. TONGUE WEIGHT.
GROSS LOAD CAPACITY WHEN USED AS A STRAIGHT LINE PULL: 9,000 LBS. MAX. LINE PULL.
***DO NOT EXCEED VEHICLE MANUFACTURER'S RECOMMENDED TOWING CAPACITY.***
HITCH WEIGHT: LBS.
INSTALL TIME: MINUTES
INSTALL NOTES:
INSTALLATION STEPS
PERIODICALLY CHECK THIS RECEIVER HITCH TO ENSURE THAT ALL FASTENERS
ARE TIGHT AND THAT ALL STRUCTURAL COMPONENTS ARE SOUND.
Curt Manufacturing Inc., warrants this product to be free of defects in material and/or workmanship at the time of retail purchase by the original purchaser. If the product is found to be defective,
Curt Manufacturing Inc., may repair or replace the product, at their option, when the product is returned, prepaid, with proof of purchase. Alteration to, misuse of, or improper installation of
this product voids the warranty. Curt Manufacturing Inc.'s liability is limited to repair or replacement of products found to be defective, and specifically excludes liability for incidental or
consequential loss or damage.
3500
350
45
35
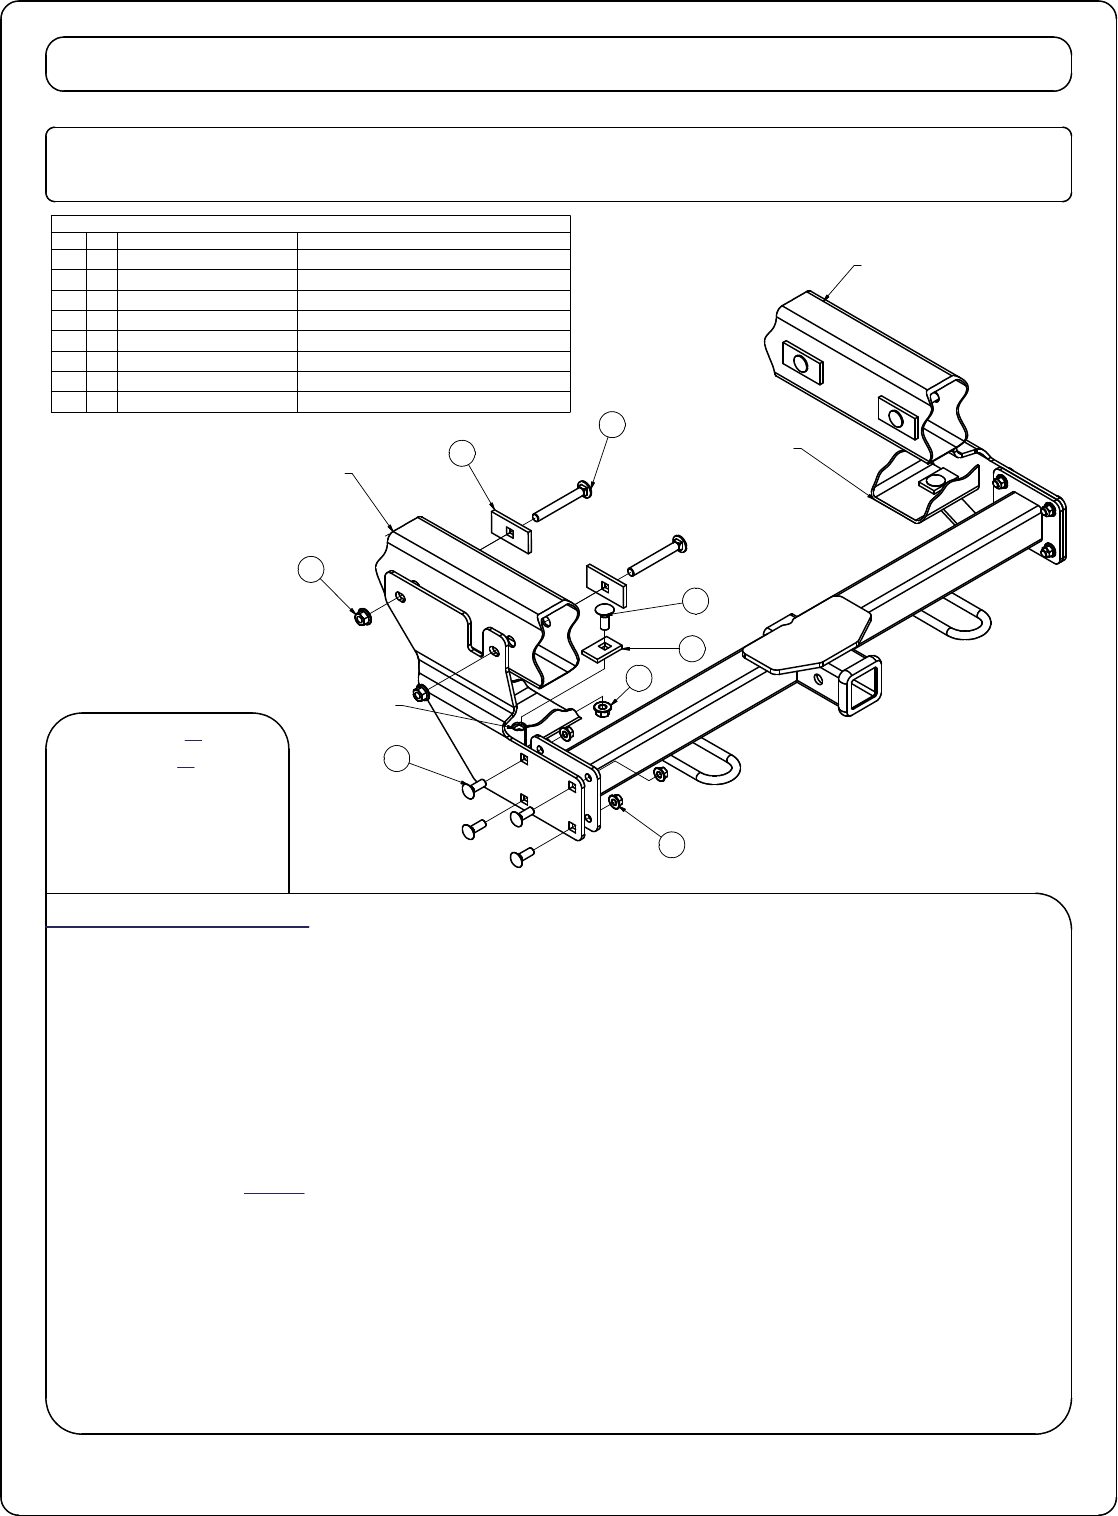
31313 TOYOTA TACOMA FRONT HITCH
08/11/2020
3
8
4
2
1
7
1. Remove 2 bolts, one from each end of front bumper beam. Pull out end caps and return to customer.
2. Place 4" carriage bolt through spacer(CM-SP4) and into existing holes from the inside of the frame
(both sides).
3. Where the end cap was removed in step 1, place a 1/2" x 1 1/4" carriage bolt through spacer(CM-SP3)
into the existing hole in the front bumper beam.
4. Hang side plates from carriage bolts installed in step 2 on the outside of the frames and finger tight with
1/2" flange nuts.
5. Lift main body into place between side plates and loosely attach using 7/16" carriage bolts and flange
nuts as shown. NOTE: On 2WD models, drilling may be required. Using the hitch as a template,
mark and drill (2) 1/2" diameter holes as shown above. Install hardware from step 3.
6. Attach straps of main body to 1/2" carriage bolts placed in step 3. Finger tight with 1/2" flange nuts.
7. Torque 1/2" x 4" fasteners to 64 ft.-lbs., 1/2" x 1 1/4" fasteners to 110 ft.-lbs. and all 7/16" fasteners to 59 ft.-lbs.
in the following order:
First: Fasten main body to side plates.
Second: Fasten strap to front bumper beam.
Third: Fasten side plates to frame.
DRIVER SIDE FRAME
PASSENGER SIDE FRAME
FRONT BUMPER BEAM
- DRILLING REQUIRED (2WD)
- REMOVE END CAPS ON
FRONT BUMPER BEAM
- REMOVE FRONT SKID
PLATE ON 07 MODELS
AND NEWER
5
DRILLED HOLES (TYP)
(2WD ONLY)
6