
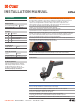
Installation Guide

CURTMFG.COM
•
NEED ASSISTANCE?
•
877.287.8 634
•
45144-INS-RB
•
PAGE 2
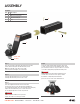
ASSEMBLY
Parts List
Item Qty Description
1 1 Loaded ball mount assembly
2 1 Anti-rattle clamp plate
3 1 Anti-rattle hitch pin
4 1 Clip
2
3
1
4
Step 2
Insert the ball mount (#1) into your receiver tube
and align with the hitch pin hole in the receiver.
Step 1
Place the anti-rattle clamp plate (#2) inside the hollow ball
mount shank and align the nut with the hitch pin hole.
Note: The small tab on the back of the clamp
plate may be bent straight to ease installation.
Step 3
Place the supplied lock washer onto the anti-rattle
hitch pin (#3) and secure the ball mount by threading the
pin completely through the nut in the anti-rattle clamp plate (#2).
Tighten the anti-rattle hitch pin to 35 ft-lbs. and insert
the clip (#4) through the hole in the exposed end.
DA NGER
Failure to tighten hardware to the specified
torque can result in serious injury or death.
Step 4
Grease the trailer ball assembly, using the grease zerk
located on the bottom of the RockerBall
™
shank. Grease
prior to initial use and once every 3 months or 3,000 miles
of use with a high-quality molybdenum-based grease.
DA NGER
Failure to grease the trailer ball assembly may lead
to failure and can result in serious injury or death.
RockerBall
™
is adequately lubricated when
grease can be seen in the areas marked below.
Grease zerk
location