
Installation Guide

WARNING: *** DO NOT EXCEED VEHICLE MANUFACTURER'S RECOMMENDED TOWING CAPACITY ***
FOR MORE INFORMATION LOG ONTO WWW.CURTMFG.COM
HAVING INSTALLATION QUESTIONS? CALL TECHNICAL SUPPORT AT 1-877-287-8634
PERIODICALLY CHECK TOWING SYSTEM TO ENSURE THAT ALL FASTENERS
ARE TIGHT AND THAT ALL STRUCTURAL COMPONENTS ARE SOUND.
CURT Manufacturing LLC., warrants this product to be free of defects in material and/or workmanship at the time of retail purchase by the original purchaser.
If the product is found to be defective, CURT Manufacturing LLC., may repair or replace the product, at their option, when the product is returned, prepaid,
with proof of purchase. Alteration to, misuse of, or improper installation of this product voids the warranty. CURT Manufacturing LLC.'s liability is limited to
repair or replacement of products found to be defective, and specifically excludes liability for incidental or consequential loss or damage. This product complies
with safety specifications and requirements for connecting devices and towing systems of the state of New York, V.E.S.C.Regulation V-5 and SAE J847.
PINTLE INSTALLATION AND OPERATING INSTRUCTIONS
48332-INS
Scan
for more
information
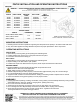
PART # PINTLE GTW
VERTICAL
LOAD
BALL GTW
BALL
DIAMETER
TORQUE CHART
PART # HARDWARE
TORQUE
48180
16,000 lbs 1,600 lbs 6,000 lbs
1-7/8"
48190
16,000 lbs 1,600 lbs 10,000 lbs
2"
48200
16,000 lbs 1,600 lbs 16,000 lbs
2-5/16"
48205
10,000 lbs 2,000 lbs
- -
48210
20,000 lbs 4,000 lbs
- -
48215
30,000 lbs 8,000 lbs
- -
48231
60,000 lbs 12,000 lbs
- -
48180, 48190, 48200, 48205,
48210, 48215, 48330
48231, 48332
1/2" 90 ft-lbs
5/8" 200 ft-lbs
12/17/2018
MOUNTING INSTRUCTIONS
1. Mounting structure must be capable of supporting the rated pintle hook capacity in accordance with SAE J847.
2. Only use CURT supplied mounting hardware torqued to the proper specification. See Torque Chart
OPERATING INSTRUCTIONS
PINTLE HOOK
1. Open latch by removing safety pin and pulling lock while lifting latch.
2. Position drawbar eye over the horn of the pintle and lower into place.
3. Push latch closed and insert safety pin.
BALL HITCH
1. Open latch by removing safety pin and pulling lock while lifting latch.
2. Replace safety pin to retain latch in open position.
3. Position ball coupler over ball and lower into place, follow coupler manufacturer's instructions.
BEFORE TOWING
1. Ensure all fasteners are tight and that all structural components are sound.
Note: Never tow with worn or damaged parts.
2. Attach trailer securely to safety chains loops.
3. Maintain adequate tongue load to properly control the trailer (approximately 10%) not to exceed ratings.
4. For off-road applications reduce the rated capacities by 25%.
5. Support the rear of trailer to avoid load shift when loading or unloading a trailer coupled to the tow vehicle.
6. Clean and lubricate moving parts regularly to ensure proper function.
WARNING!!
1. Vehicle performance (braking, handling, acceleration, turning radius) can be drastically affected by towing a trailer.
Allow additional time / space for stopping, changing lanes, passing and turning.
2. Do not tow more than one trailer at a time.
3. Severe bumps can damage your towing system. Avoid or drive slowly over rough terrain.
4. Do not damage the latch. Be particularly careful with the drawbar when coupling and uncoupling.
5. Other steps and inspections are also required. Consult D.O.T. regulations and American
Trucking Association for complete towing procedures.
NOTE
: VIEW REPRESENTATIVE ONLY.
PINTLE, HARDWARE, AND MOUNT MAY VARY