
Installation Guide
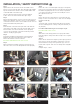

A B
H
C
D
G I
E F
INSTALLATION
/
SAFETY INSTRUCTIONS
Step 1
Open the driver-side door and locate the vehicle brake control
harness connector under the dash, above the brake pedal. It will be
taped to another harness and the connector will be similar to that
on the CURT brake control harness (A).
On some vehicles the harness may be located in a different
location. If it is not located under the dash, skip to step 5.
Step 2
Remove tape and protective cover from connector. Take care not to
damage the locking tabs. Insert the connector on the CURT brake
control harness into the vehicle connector. Make sure the connector
is fully inserted with locking tabs in place.
Step 3
Route the brake control harness along the back of the dash and
out the bottom to the brake control unit. Insert the brake control
harness's black connector into the brake control's quick plug
connector. Secure the brake control harness with the provided
cable ties, avoiding any pinch points.
Step 4
Complete the installation using the brake control instructions.
Mount the unit as directed and perform test procedures as
instructed in the brake control user manual.
For vehicles with shifter lever in center console
Step 5
Depress the brake and shift the vehicle into first gear. On each
side of the console, remove the black plastic floor trim panel (B).
Step 6
Remove the center console finish plate using a pry tool and gently
prying top out on both sides (C). Remove the trim panel surrounding
the shifter lever (D). Open the floor console storage compartment
cover and removing three Torx-head screws holding the cover in
place (E). Remove the cover.
Step 7
Remove the two bolts securing the floor console trim in place (F).
Pull up on center console trim to remove. Take care not to damage
the alignment tabs (G).
Step 8
To left of the radio, locate the skinny panel with the vent and 4x4
selector in it. Gently pull out on the top of the panel and work your
way down (H).
For vehicles with flow-through console: Skip to step 10.
For vehicles with center console
Step 9
On the bottom of the skinny panel there is a pivot point. Pull the
panel out and pivot on this point to allow enough room to complete
step 10 (I).
Step 10
Remove the two 7mm bolts securing the pocket in place (J). Remove
the pocket to locate the vehicle brake control harness connector
inserted in the back of the pocket. Separate the grey connector
from the back of pocket. Take care not to damage the locking tabs.
Step 11
Complete steps 2, 3 and 4.
CURTMFG.COM • NEED ASSISTANCE? • 1.800.798.0813 • RA • PAGE 2