
Installation Guide


Make Model
Acura CL Series
Acura Integra
Acura MDX
Acura RL Series
Acura TL Series
Honda Accord
Make Model
Honda CR-V
Honda Element
Honda Odyssey
Honda Pilot
Honda Prelude
Isuzu Oasis
INSTALLATION INSTRUCTIONS
CUSTOM WIRING
CONNECTOR
WIRING LOCATION GUIDEAPPLICATIONS
NOTICEWARNING
TOOLS NEEDED
Signal Circuits - 3.0 amps per side
Tail / Running Circuits - 5.0amps total
Check vehicle owner's manual or contact
the vehicle manufacturer for more information.
Panel trim removal tool
Phillips screwdriver
Flat blade screwdriver
WARNING: DO NOT EXCEED PRODUCT RATING OR TOW VEHICLE LAMP LOAD RATING, WHICHEVER IS LOWER
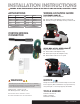
SUVS, MINI & FULL-SIZED VANS
(
S
)
Representative vehicle shown below
S1 - Behind driver side taillight housing
S2 - Behind passenger side taillight housing
S3 - Behind driver side rear access panel
S1
S3
S2
PASSENGER CARS
(
P
)
Representative vehicle shown below
P3 - Behind driver side taillight housing, inside of trunk
P4 - Behind passenger side taillight housing, inside of trunk
P3 P4
All steps must be followed to ensure the wiring connector will
function properly. Once installed, test for proper function by
using a test light or connecting a properly wired trailer.
Exceeding the product rating can cause loss of warranty,
overheating and potential fire. Do not exceed product rating
or tow vehicle lamp load rating, whichever is lower.
PAGE 1 • 55336-INS-RB