
Installation Guide


HG IHG I
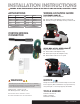
INSTALLATION
/
SAFETY INSTRUCTIONS
Honda Pilot (G)
Open the vehicle trunk and carefully pry the driver side threshold
to locate the vehicle wiring connector. The connector will be
similar to that of the custom wiring connector.
Honda Element (H,I)
Open the vehicle trunk and remove the cargo door on the floor.
Remove the screws holding the spring loaded hinge cover and
carefully set the cover aside.
Carefully remove the three plastic clips that hold the passenger
side trim panel to the floor. Remove the five screws that hold
the passenger side trim panel in place. Remove the cargo net
bracket and carefully pull back the trim panel being careful not
to break any tabs or clips.
Step 3
Locate the vehicle harness connectors. Untape the vehicle
connectors, taking care not to damage the locking tabs. Inspect
the connector for dirt and debris. Clean if necessary.
Step 4
Insert the custom wiring connector into the
vehicle connector. Make sure the connectors
are fully inserted with the locking tabs in place.
Step 5
Locate a flat spot inside the vehicle, near the taillight. Adhere
the black converter box using the provided double-sided tape.
Step 6 - Honda CR-V ONLY
Route the custom wiring connector 4-flat plug out
from under the trim panel and along the carpet edge.
Step 7
Reinstall all items removed during install and reconnect
negative battery terminal. Install the provided 4-flat dust cover
to help prevent corrosion.
PAGE 3 • 55336-INS-RB