
Installation Guide
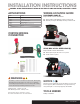

A B C
D E F
Step 1
Open the vehicle tailgate. Locate the vehicle wiring
harness for the specific vehicle following step 2.
Step 2
Outback
Remove the cargo nets and carpet from center and left cargo
area (A). Remove the black plastic from the center and left
cargo area using a pry tool.
Forester
Locate the vehicle wiring connector in the spare tire area on the
passenger side under the threshold or the carpet panel near
the passenger side interior trim panel. Remove the fasteners
securing the trim panel and remove the panel (C).
Tribeca
Remove the cargo nets and roll back the carpet in the rear
cargo area. Remove the four plastic fasteners securing the jack
compartment (D). The harness will be located under the rear
trim panel near the location shown in figure (B).
Step 3
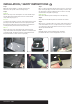
Once you have located the vehicle wiring connector, remove the
tape covering the plug. Insert the custom wiring connector end
into the vehicle connector. Make sure the connectors are fully
inserted with locking tabs in place (E).
Outback Only
Insert the 4-flat through the existing hole in the panel (F).
Step 4
Insert the provided 10-amp fuse into the inline fuse holder.
Step 5
When in use, route the 4-flat to the center of the vehicle and out
of the trunk. When not in use, roll up and store in a convenient,
out of the way location inside the trunk. Secure any loose wires
with the provided cable ties.
Step 6
Reinstall all items removed during install. Install the
provided 4-flat dust cover to help prevent corrosion.
INSTALLATION
/
SAFETY INSTRUCTIONS
55370-INS-RA • PAGE 2