
Installation Guide
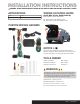

A B C
D
H
E F
1 2
G
3 4
G G G
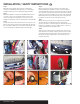
Step 1
Open the vehicle tailgate. Remove the two 10 mm bolts
securing each taillight assembly (A). Pull out on the taillight
assemblies taking care not to damage the alignment tabs.
Step 2
Behind the taillights locate the vehicle taillight wiring harness
connectors. The connectors will be similar to those on the
custom wiring harness. Separate the connectors from the
taillight housing taking care not to damage the locking tabs (B).
Step 3
Fold the rear seats down and remove the rear cargo tray cover.
Remove cargo tray by removing four 10 mm bolts (C). Remove
the scuff panel by pulling out on the bottom and then up. Take
care not to damage the alignment tabs on the back (D).
Step 4
On both sides of the vehicle, pull back on the interior trim
panels (E). Behind the taillights locate the oval grommet that
has the taillight wiring harness running through it from inside the
vehicle (F). Pull out grommet and make a small slit using a utility
knife from the top to the middle on both sides of the vehicle (G).
Behind the interior trim panel temporarily remove the seat belt
bracket by removing two bolts holding it in place (H).
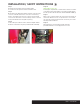
Step 5
On the driver side route the custom wiring harness end with
yellow wire behind seat belt bracket and out through the
grommet. Insert the custom wiring harness end with yellow wire
between the separated connectors. Make sure the connectors
are fully inserted with locking tabs in place.
Step 6
Route the custom wiring harness end with green wire out from
under the interior trim panel, under the removed cargo tray and
under the passenger side trim panel. Route the green wire out
through the grommet. Repeat step 5 on the passenger side
using the green wire.
INSTALLATION
/
SAFETY INSTRUCTIONS
55530-INS-RB • PAGE 2