
Installation Guide
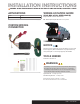


A B C
D
Step 1
Open the vehicle tailgate. Remove all trunk floor coverings.
Step 2
Remove the rear scuff panel. On the passenger side, partially
remove the rear trim panel to locate the rear junction box (A).
Step 3
Insert the custom connector into the top right corner of the
junction box. Make sure the connectors are fully inserted
with locking tabs in place (B).
Step 4
Locate a flat spot inside the vehicle, near the taillight. Adhere
the black converter box using the provided double-sided tape.
Step 5
Insert the provided 10-amp fuse into the in-line fuse holder.
Step 6
Locate a suitable grounding point near the connector such as
an existing screw with nut in the vehicle frame or drill a 3/32"
pilot hole for the provided screw. The area should be free of
rust, dirt and paint. Secure the white ground wire using the ring
terminal and provided screw.
WARNING: Check for miscellaneous items that may be
hidden behind or under any surface before drilling to avoid
damage and / or personal injury.
Step 7
Route the 4-flat wire out from under the rear trim panel, along
the removed scuff panel and under the driver side rear trim panel.
Step 8
Locate fuse compartment on passenger side kick panel, near
the glove box. Remove the fuse panel cover and insert the
provided 10-amp fuse into position #5 (C,D).
Step 9
When in use, route the 4-flat to the center of the vehicle. When
not in use, roll up and store in a convenient, out of the way
location. Secure any loose wires with the provided cable ties.
Step 10
Reinstall all items removed during install and reconnect
negative battery terminal. Install the provided 4-flat dust cover
to help prevent corrosion.
Step 11
Reinstall all items removed during install. Install the
provided 4-flat dust cover to help prevent corrosion.
INSTALLATION
/
SAFETY INSTRUCTIONS
56161-INS-RB • PAGE 2