
Installation Guide


Step 1
Open the vehicle tailgate. Fold down the driver side
rear seat to access the interior trim panel (A).
Step 2
On the interior trim panel, remove the
access cover labeled 'AUX FUSE' (B).
Step 3
Locate the vehicle trailer wiring harness connector. The connector
will be similar to the one on the custom wiring connector (C).
Step 4
Insert the vehicle trailer wiring harness connector into
the custom wiring connector. Make sure the connectors
are fully inserted with locking tabs in place.
WARNING: Check for miscellaneous items that
may be hidden behind or under any surface before
drilling to avoid damage and / or personal injury.
Step 5
Locate a flat spot behind the removed access panel.
Adhere the black converter box using the provided
double-sided tape. Secure the remainder of the
connector with the provided cable ties.
Step 6
On the driver side, behind the rear bumper fascia, above the tail
pipe, locate the grey trailer wiring harness connector. Release
connector from its clip and remove the cover from the housing.
Insert the 4-flat harness connector. If the cover is not present,
be sure the connector and contacts are free of dirt and debris.
Make sure that the housings are fully inserted with locking tabs
in place (D).
Step 7
When in use, route the 4-flat along the rear bumper to the
center of the vehicle. When not in use, roll up and store in a
convenient, out of the way location. Secure any loose wires
with the provided cable ties.
Step 8
Reinstall all items removed during install and
reconnect negative battery terminal. Install the
provided 4-flat dust cover to prevent corrosion.
Step 9
Locate vehicle fuse box in the engine compartment on the
driver side (E). Insert tow / trailer fuse provided (F). Check
the vehicle owner's manual for location or contact the vehicle
manufacturer for more information.
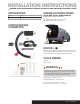
INSTALLATION
/
SAFETY INSTRUCTIONS
A B C
D E F
56170-INS-RC • PAGE 2