
Installation Guide


A B C
D
G
E F
HH
1 2 3 4
HH
Step 1
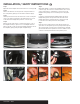
Open the vehicle tailgate. Remove all trunk floor coverings (A,B).
Step 2
Remove the fasteners securing the rear scuff panel. Remove
the scuff panel by pulling out on the bottom and then up (C).
Step 3
Starting on the driver side, remove the two screws securing the
cargo loops. Remove the interior side wall inspection cover to
locate the vehicle taillight wiring harness connectors (D).
Step 4
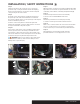
On the outside of the vehicle, locate and remove the cover on
the taillight assembly to gain access to the taillight fasteners.
Remove the two screws securing the taillight and gently remove
the taillight by gently pulling the light straight back (E).
Step 5
Behind the taillight, locate the vehicle taillight wiring harness
connectors (F). The connectors will be similar to those on the
custom wiring harness. Separate the connectors from the
taillight housing taking care not to damage the locking tabs.
Step 6
Locate the grommet behind the taillight where the vehicle
taillight wiring passes though from inside the cabin to the
taillight. Remove the grommet and cut a slit large enough
to route the custom wiring harnesses though (G,H).
Step 7
Route the custom wiring harness ends with the yellow and
green wires out through the grommet opening and though the
slit in the grommet. Insert the custom wiring harness end with
yellow wire between the separated connectors. Make sure the
connectors are fully inserted with locking tabs in place.
INSTALLATION
/
SAFETY INSTRUCTIONS
56181-INS-RB • PAGE 2