
Installation Guide
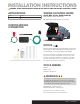

A B C
D E F
Step 1
Locate vehicle battery on the driver side under the
hood and disconnect the negative battery terminal.
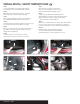
Step 2
Open the rear hatch and remove the floor coverings
and storage trays on the passenger side (A,B).
Step 3
Remove the scuff panel by using a pry tool. Take care
not to damage the alignment tabs on the back (C).
Step 4
Unscrew and remove the tire jack. Remove the cargo loops
from the rear trim panel using a 10mm socket (D).
Step 5
Gain access to the vehicle connector by using a pry tool
to pull back on the rear trim panel, making sure not to
damage the locking tabs (E).
Step 6
Locate the vehicle connector (F). The connector
will be similar to the one on the custom connector.
Step 7
Insert the custom connector end into the
vehicle connector. Make sure the connectors
are fully inserted with locking tabs in place.
Step 8
Locate a flat spot behind the side trim panel and
adhere the black converter box using the double-sided
tape provided. Secure any loose parts of the wiring
connector with the provided cable ties.
Step 9
When in use, route the 4-flat to the center of the vehicle. When
not in use, roll up and store in a convenient, out of the way
location. Secure any loose wires with the provided cable ties.
Step 10
Reinstall all items removed during install and
reconnect negative battery terminal. Install the
provided 4-flat dust cover to help prevent corrosion.
INSTALLATION
/
SAFETY INSTRUCTIONS
56338-INS-RA • PAGE 2