
Installation Guide


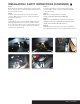

A B
H
C
D
G I
E F
Step 1
Locate vehicle battery on the driver side under the
hood and disconnect the negative battery terminal.
Step 2
Open the vehicle trunk. Fold down the rear seats and remove
the floor push fasteners that attach to the rear seats (A).
Step 3
Lift up on the floor cargo storage lid to locate the three
10mm bolts securing the cargo storage unit in place (B).
If equipped with a rear subwoofer
Carefully remove the subwoofer by unscrewing the retainer
bolt located at the top of the speaker. Locate the power wire
connected to the speaker and carefully disconnect it taking
care not to damage the locking tabs. Set the subwoofer aside.
Step 4
Remove the center cover for the scuff panel (C). Remove
the scuff panel by pulling out on the bottom and then up.
Take care not to damage the alignment tabs on the back (D).
Step 5
Using the trim panel removal tool, remove the push fasteners
securing the cargo storage unit in place (E). Remove the cargo
storage unit by lifting it up (F).
Step 6
Remove the two 10mm bolts from the cargo tie downs securing
the side trim panel (G). Using the trim panel removal tool,
remove the push fasteners from the side trim panel (H).
Step 7
Locate the custom wiring connector, two blue relays and one
brown relay from the custom wiring kit. Carefully insert the
relays into the relay harness (I). Ensure that the relays are fully
inserted with locking tabs in place.
WARNING: The use of relays not provided
in the bag kit can cause the harness to not function
properly or may damage the vehicle and trailer.
INSTALLATION
/
SAFETY INSTRUCTIONS
56357-INS-RA • PAGE 2