
Installation Guide


J K L
M
N
INSTALLATION
/
SAFETY INSTRUCTIONS
(
CONTINUED
)
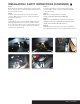
Step 8
On the driver side, under the side trim panel, locate the vehicle
wiring connectors (J). The connectors will be similar to those on
the custom wiring connector.
Step 9
Insert the custom wiring connector into the vehicle wiring
connector. Make sure the connectors are fully inserted with
locking tabs in place (K).
Step 10
Underneath the vehicle, locate the vehicle taillight connectors
behind the rear bumper (L). The connectors will be similar to
those on the custom wiring connector. Remove the protective
covers from the vehicle connectors. All connectors surfaces
should be clean and free of dirt.
Step 11
Insert the custom wiring connector into the vehicle wiring
connector. Make sure the connectors are fully inserted with
locking tabs in place.
Step 12
Open the hood of the vehicle to locate the
relay box behind the driver-side headlight (M).
Step 13
Open fuse cover and insert the two blue relays from the
wiring kit into the open cavities (N). Ensure that the relays
are fully inserted with locking tabs in place.
Step 14
Reinstall the fuse cover and close hood. Reinstall all items
removed during install and reconnect negative battery terminal.
PAGE 3 • 56357-INS-RA