RADIO CD MICRO SYSTEM
SAFETY INSTRUCTIONS CAUTION RISK OF ELECTRIC SHOCK DO NOT OPEN CAUTION: TO REDUCE THE RISK OF ELECTRIC SHOCK, DO NOT REMOVE COVER (OR BACK). NO USER-SERVICEABLE PARTS INSIDE. REFER SERVICING TO QUALIFIED SERVICE PERSONNEL.
SAFETY INSTRUCTIONS Before using the unit, be sure to read all operating instructions carefully. Please note that these are general precautions and may not pertain to your unit. For example, this unit may not have the capability to be connected to an outdoor antenna. 1. READ INSTRUCTIONS All the safety and operating instructions should be read before the product is operated. 2. RETAIN INSTRUCTIONS The safety and operating instructions should be retained for future reference. 3.
SAFETY INSTRUCTIONS 22. DAMAGE REQUIRING SERVICE Unplug the product from the wall outlet and refer servicing to qualified service personnel under the following conditions: a. When the power-supply cord or plug is damaged. b. If liquid has been spilled or objects have fallen into the product. c. If the product has been exposed to rain or water. d. If the product does not operate normally by following the operating instructions.
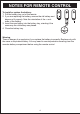
NOTES FOR REMOTE CONTROL To install or replace the battery: 1. Pull the battery tray out of the remote. 2. If you are replacing the battery, remove the old battery and dispose of it properly. Note the orientation of the + and sides of the battery. 3. Insert the new battery into the battery tray, orienting it the same way the old battery was placed. 4. Close the battery tray. Warning There is danger of an explosion if you replace the battery incorrectly. Replace only with the same or equivalent battery.
PREPARATION FOR USE Power Sources This portable audio system is designed to operate on either 120V AC, 60Hz house current. AC Outlet AC Plug AC Operation Unwind the AC cord and extend it to its full length. Insert the small end of the AC cord into the AC socket on the rear of the unit. Insert the other end of the AC cord into any convenient 120V AC, 60Hz household outlet. Please note that this unit is equipped with a polarized AC plug which has one blade wider than the other.
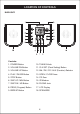
LOCATION OF CONTROLS MAIN UNIT: Controls: 1. POWER Button 10. TUNING Knob 2. VOLUME DN Button 11. CLK SET (Clock Setting) Button 3. VOLUME UP Button 12. AM / FM / CD / AUX (Function) Selector 4. PLAY / PAUSE Button 13. OPEN / CLOSE Area 5. STOP Button 14. CD Door 6. SKIP UP / MIN Button 15. IR Window 7. SKIP DN / HR Button 16. PHONE Jack 8. PROG (Program) Button 17. LCD Display 9. REPEAT Button 18.
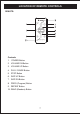
LOCATION OF REMOTE CONTROLS REMOTE: Controls: 1. POWER Button 2. VOLUME DN Button 3. VOLUME UP Button 4. PLAY / PAUSE Button 5. STOP Button 6. SKIP UP Button 7. SKIP DN Button 8. PROG (Program) Button 9. REPEAT Button 10.
OPERATING INSTRUCTIONS Checking FM /AM Radio Reception Your MICRO SYSTEM has a built-in antenna for AM radio. To improve reception, you need to rotate your unit. Unwind the external FM wire antenna and extend it to its full length to improve the FM reception. Unpacking and Set Up • Remove the main unit, the speakers, and the remote control unit from the display carton. Remove all packing materials from the components. • Unwind the AC power cord and extend it to its full length.
OPERATING INSTRUCTIONS Stereo Headphone Jack You may connect stereo headphones (not included) to the Headphone jack on the front panel of this system for private listening without disturbing others. When headphones are connected the speakers are automatically shut off. IMPORTANT: Before you connect your headphones, set the VOLUME control of this system to a low level. Then connect your headphones, put them on and gradually increase the volume to a comfortable listening level.
OPERATING INSTRUCTIONS To set up a CD program (program up to 20 tracks): 1. Press the POWER Button to turn on your unit, and then rotate the FUNCTION Knob to CD position. The CD track "--" appears on the display. 2. Insert a CD into the CD compartment. If the CD starts playing, press the STOP Button. 3. Press the PROG Button. "01" appears on the display. 4. Press the SKIP UP / DN Buttons one or more times to select the first track you want to program. 5. Press the PROG Button to confirm your selection. 6.
OPERATING INSTRUCTIONS Caring for Compact Discs • Treat the disc carefully. Handle the disc only by its edges. Never allow your fingers to come in contact with the shiny, unprinted side of the disc. • Do not attach adhesive tape, stickers, etc. tothe disc label. • Clean the disc periodically with a soft, lint-free, dry cloth. Never use detergents or abrasive cleaners to clean the disc. If necessary, use a CD cleaning kit.
TROUBLESHOOTING GUIDE PROBLEM POSSIBLE CAUSE SOLUTION GENERAL No sound is heard. No sound is heard. Power is not on. Press the POWER button. VOLUME Control is set to minimum. Adjust the VOLUME Control. RADIO Station has not been tuned properly. Tune station properly . FM reception is weak. Extend the FM cord. Wrong function is selected. Press the FUNCTION button to the radio position. CD All or part of the CD will not play. CD is inserted incorrectly. CD is scratched.