MODEL NO.
SAFETY PRECAUTIONS CAUTION RISK OF ELECTRIC SHOCK DO NOT OPEN CAUTION: TO REDUCE THE RISK OF ELECTRIC SHOCK, DO NOT REMOVE COVER (OR BACK). NO USER-SERVICEABLE PARTS INSIDE. REFER SERVICING TO QUALIFIED SERVICE PERSONNEL. The lightning flash with arrowhead symbol within an equilateral triangle is intended to alert the user to the presence of uninsulated 'dangerous voltage' within the product's enclosure that may be of sufficient magnitude to constitute a risk of electric shock to persons.
INFORMATION: This equipment has been tested and found to comply with the limits for a Class B digital device, pursuant to Part 15 of the FCC Rules. These limits are designed to provide reasonable protection against harmful interference in a residential installation. This equipment generates, uses and can radiate radio frequency energy and, if not installed and used in accordance with instructions, may cause harmful interference to radio communications.
IMPORTANT SAFETY INSTRUCTIONS (CONTINUED) 11. 12. 13. 14. 15. 16. 17. 18. type of power source indicated on the marking label. If you are not sure of the type of power supply to your home, consult your appliance dealer or local power company. For products intended to operate from battery power, or other sources, refer to the operating instructions. GROUNDING OR POLARIZATION This product is equipped with a polarized alternating-current line plug (a plug having one blade wider than the other).
Dear Customer: Selecting fine audio equipment such as the unit you've just purchased is only the start of your musical enjoyment. Now it's time to consider how you can maximize the fun and excitement your equipment offers. This manufacturer and the Electronic Industries Association's Consumer Electronics Group wants you to get the most out of your equipment by playing it at a safe level.
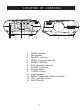
LLOC OCATION ATION OF OF CCONTR ONTROL OLSS PM VOL. REMOTE SENEOR ALM 1 ALM 2 1 2 3 4 5 6 7 1. 2. 3. 4. 5. 6. 7. 8. 9. 10. 11. 12. 13. 8 10 9 11 SLEEP Indicator PM Indicator ALARM 1 Indicator PROG. (Program) Indicator REPEAT Indicator RAN. (Random) Indicator ALARM 2 Indicator Remote Sensor TUNING Control Right Speaker Battery Compartment (Bottom of Unit) VOL.
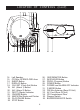
L OC ATION OF C ONTR OL S (C ont') 34 33 32 31 30 29 28 27 SKIP 14 14. 15. 16. 17. 18. 19. 20. 21. 22. 23. 24. 25. 15 16 17 18 19 20 21 22 DIMMER LOW 23 24 25 26 Left Speaker CD Door OPEN/CLOSE Area SLEEP Button DISPLAY Button CLK SET (Clock Set) Button AL1 (Alarm 1) Button AL2 (Alarm 2) Button FM ST (Stereo) Indicator SNOOZE Button AM/FM Dial Scale and Pointer PLAY/PAUSE Button STOP Button 35 26. 27. 28. 29. 30. 31. 32. 33. 34. 35. 36. 6 HIGH 36 SKIP/MINUTES Button SKIP/HOUR Button PROG.
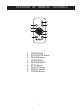
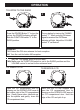
L OC ATION C ONTR OL S OL S L OC ATION OF ROF E MOTE C ONTR POWER 9 1 8 PROG 2 3 7 6 4 SLEEP SNOOZE 5 REMOTE CONTROL 1. 2. 3. 4. 5. 6. 7. 8. 9.
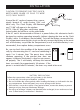
INS TAL L ATION C AUT ION: TO P R E V E NT E LE C T R IC S HOC K , MAT C H WIDE B LADE OF P LUG TO WIDE S LOT, F ULLY INS E R T. AC Outlet Unravel the AC cord and connect it to a conveniently located AC outlet having 120V and 60Hz only. T he C lock Dis play will illuminate AC Plug and "12:00" will appear in the window. NOT E : If the AC plug does not fit into a nonpolarized outlet, do not file or cut the wide blade.
OPERATION TION TO LISTEN TO THE RADIO 1 2 2 1 SKIP 12 SKIP 1 Tune a station by turning the TUNING control "1". When a strong FM stereo signal is received the FM Stereo indicator will light. Adjust the VOLUME control "2" as desired. Press the POWER Button "1" to turn the unit on; the POWER indicator will light. Slide the FUNCTION switch "2" to the RADIO position. Antennas FM: Extend the FM wire antenna for best reception. AM: Turn the unit for better AM reception.
OP E R ATION (C ONTINUE D) TO PLAY A CD 1 2 1 2 1 SKIP SKIP Insert a CD as described on the previous page. Press the POWER button "1" to turn the unit on; The Power indicator will light. Slide the FUNCTION swtich "2" to the CD position. (The total number of track will appear in the display). Press the PLAY/PAUSE button to start playback. TO PAUSE PLAYBACK, press the PLAY/PAUSE button again; the display will briefly blink. Press again to resume playback.
OPERATION (CONTINUED) TO REPEATEDLY PLAY BACK ONE TRACK 1 2 3 2 1 2 3 SKIP Press the POWER button "1" to turn the unit on; The Power indicator will light. Slide the FUNCTION swtich "2" to the CD position. Press the P-MODE button "3" once; the REPEAT indicator will blink. SKIP 1 1 4 Press the SKIP "1" or "2" button to select a track and the PLAY/PAUSE button "3" to start playback and the unit will play the same track over and over until the STOP button "4" is pressed.
OPERATION (CONTINUED) TO PLAY CD TRACK RANDOMLY 1 2 3 2 1 1 2 SKIP All CD Track will play randomly, press the P-MODE button again to cancel RANDOM Mode. Press the POWER button "1" to turn the unit on; the POWER indicator will light. Slide the FUNCTION switch "2" to the CD position. Press the P-MODE button "3" three times; the RANDOM indicator will light solid. TO DIMMER DISPLAY 1 1 2 SKIP SKIP Slide the DIMMER switch High or Low to adjust the display brightness.
OPERATION (CONTINUED) TO PROGRAM THE MEMORY (UP TO 20 TRACKS) 1 2 3 2 1 2 SKIP 13 1 SKIP Press the POWER button "1" to turn the unit on; the POWER indicator will light. Slide the FUNCTION switch "2" to the CD position. Press the PROG. button "3" once; "P 01" will appear in the display and the PROG. indicator will blink. Within 7 seconds, select the first track to be played back using the SKIP "1" or "2" button, then press the PROG. button "3" again.
OPERATION (CONTINUED) TO SET OR RESET THE ACTUAL TIME 1 2 2 1 2 SKIP SKIP 1 1 3 Press the CLK SET button once; the time will blink. Press the SKIP/HOUR button "1" to set the present hour and the SKIP/MINUTE button "2" to set the present minute. Press the CLK SET "3" button to confirm the time. TO SET OR RESET THE ALARM TIME 2 1 2 1 2 SKIP SKIP 1 1 3 Press the SKIP/HOUR button "1" to set the desired alarm hour and the SKIP/MINUTE button "2" to set the desired alarm minute.
OPERATION (CONTINUED) TO SET THE ALARM TO WAKE TO RADIO 1 2 1 1 2 SKIP 4 3 When the actual time matches the selected preset alarm time(s), the unit automatically turns on for 59 minutes and then shuts off. To Shut the alarm, see TO SHUT THE ALARM OFF section on the next page. Set the alarm time as previously instructed. Slide the FUNCTION switch "1" to the RADIO position, select a radio station and make sure the VOLUME "2" is set as desired.
OPERATION (CONTINUED) TO SET THE ALARM TO WAKE TO BUZZER 1 2 1 2 SKIP 1 SKIP After switch to the BUZZER position and make sure the power is off. When the actual time matches the selected preset alarm time(s), the unit automatically turns on. To shut off the alarm, see TO SHUT THE ALARM OFF section below. Set the alarm time as previously instructed. Slide the FUNCTION Switch to BUZZER position.
OPERATION (CONTINUED) TO ACTIVATE THE SLEEP FUNCTION 1 2 1 1 SKIP SKIP Tune the desired radio station or insert a CD as previously instructed and press the POWER button to turn the unit on; the POWER indicator will light. 3 SKIP Press the SLEEP button and "90" will appear and set the unit to turn off after 90 minutes. Press a third time to set to 60 minutes. Press a fourth time to set to 30 minutes. Press a fifth time to set to 15 minutes.
CARE AND MAINTENANCE Caring for Compact Discs * Treat the disc carefully. Handle the disc only by its edges. Never allow your fingers to come in contact with the shiny, unprinted side of the disc. * Do not attach adhesive tape, stickers, etc. to the disc label. * Clean the disc periodically with a soft, lint-free, dry cloth. Never use detergents or abrasive cleaners to clean the disc. If necessary, use a CD cleaning kit.
TROUBLESHOOTING GUIDE If you experience a problem with this unit, check the chart below: SYMPTOM Unit will not turn on. Disc will not play. CAUSE AC cord not connected. CD compartment not closed. Disc inserted incorrectly. Dirty or defective CD. Moisture condensation on disc. No sound. VOLUME control set to minimum. Defective disc. Erratic playback. Dirty or defective disc. Time reset to "12:00". Battery connected improperly, not connected or dead. Clock not set.