MODEL NO.
WARNING AND PRECAUTIONS TO PREVENT FIRE OR SHOCK HAZARDS, DO NOT EXPOSE THIS UNIT TO RAIN OR MOISTURE. This symbol, located on back or bottom of the unit, is intended to alert the user to the presence of uninsulated “dangerous voltage” within the product’s enclosure that may be of sufficient magnitude to constitute a risk of electric shock to persons.
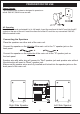
PREPARATION FOR USE Power Sources This portable audio system is designed to operate on either 230V AC, 50Hz house current. AC Operation Unwind the AC cord and extend it to its full length. Insert the small end of the AC cord into the AC socket on the rear of the unit. Insert the other end of the AC cord into any convenient 230V AC, 50Hz household outlet. Connecting the Speakers Place the speakers on either side of the main unit.
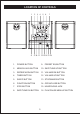
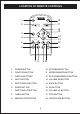
LOCATION OF CONTROLS 1 2 3 4 5 6 7 8 9 10 11 12 13 14 15 16 1. POWER BUTTON 9. 2. MEM/CLK ADJ BUTTON 10. SKIP/TUNE UP BUTTON 3. REPEAT/M-DN BUTTON 11. VOLUME DN BUTTON 4. TIMER BUTTON 12. VOLUME UP BUTTON 5. SLEEP BUTTON 13. STOP/BAND BUTTON 6. FUNCTION BUTTON 14. OPEN/CLOSE BUTTON 7. IPOD BUTTON 15. HEADPHONE JACK 8. SKIP/TUNE DN BUTTON 16.
LOCATION OF REMOTE CONTROLS EJECT POWER 1 18 2 iPOD 16 15 VOL 3 EQ FM ST 4 MUTE VOL TUNE/SKIP BAND MEM-UP CLK SET MEM DN 5 6 REPEAT 7 8 17 14 13 12 11 9 10 1. POWER BUTTON 10. STOP/BAND BUTTON 2. FUNCTION BUTTON 11. REPEAT/MEM DN BUTTON 3. DISPLAY BUTTONS 12. PLAY/PAUSE/MEM UP BUTTON 4. FM ST BUTTON 13. VOLUME DN BUTTON 5. SKIP/TUNE DN BUTTON 14. MUTE BUTTON 6. SLEEP BUTTON 15. EQ BUTTON 7. SKIP/TUNE UP BUTTON 16. VOLUME UP BUTTON 8. TIMER BUTTON 17.
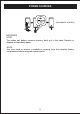
POWER SOURCES (FOR REMOTE CONTROL) BATTERIES NOTE: The button cell battery contains mercury, don't put in the trash. Recycle or dispose as hazardous waste. NOTE: You may need to remove a protective covering from the remote's battery compartment before using the remote control.
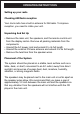
OPERATING INSTRUCTIONS Setting up your radio Checking AM Radio reception Your clock radio has a built-in antenna for AM radio. To improve reception, you need to rotate your unit. Unpacking And Set Up • Remove the main unit, the speakers, and the remote control unit from the display carton. Remove all packing materials from the components. • Unwind the AC power cord and extend it to its full length. • Unwind the external FM wire antenna and extend it to its full length.
OPERATING INSTRUCTIONS Using your radio 1. 2. 3. 4. 5. 6. 7. Plug the AC Power cord into a power outlet. Press the POWER button on the main unit or remote control to turn the system "On". If necessary, press the FUNCTION button to select the Radio mode and the display shows: FM 87.5 MHz. To switch between FM and AM bands press the STOP/BAND button on the front panel or remote. Automatic Tuning - Depress and hold the TUNING / SKIP UP or DN buttons until the display begins to move, then release the buttons.
OPERATING INSTRUCTIONS Programming radio station presets: You can program as many as 10 FM and 10 AM radio station presets. After you program a station, you can tune to the station by pressing one of the SKIP/TUNE Buttons. To program a radio station: 1. 2. 3. 4. 5. 6. 7. 8. Press the POWER Button to turn on your radio. Press the FUNCTION Button one or more times until TUNER appears on the display. Press the BAND Button to select AM or FM.
OPERATING INSTRUCTIONS To tune to a radio station preset: 1. 2. 3. 4. Press the POWER Button to turn on your radio. Press the FUNCTION button one or more times until TUNER appears on the display. Press the STOP/BAND Button to select AM or FM. Press the MEM DN or MEM UP Button one or more times until the preset number you want appears on the display.
OPERATING INSTRUCTIONS To active Timer function: In power off mode, you depress the TIMER button 2 seconds, the "TIMER" appear on the display, that the unit will auto on at "TIMER on" time and will auto off at "TIMER off" time If you depress the TIMER button again, the TIMER function will be cancel. 1. 2. 3. Press the TIMER button and the "TIMER on" will appear on the display. Hold the TIMER button 2 seconds and the hour will blink.
OPERATING INSTRUCTIONS To set up a CD playlist: 1. 2. 3. 4. 5. 6. 7. Press the POWER Button to turn on your unit, then Press the FUNCTION Button one or more times until CD track "--" appears on the display. Insert a CD into the CD tray. If the CD starts playing, press the STOP Button. Press the MEM/CLK ARJ Button. "PROG 0" appears on the display. Press one of the SKIP/TUNING Buttons one or more times to select the first track you want to program. Press the MEM/CLK ARJ Button to confirm your selection.
OPERATING INSTRUCTIONS iPod® Inserts Your unit comes with removable inserts* to ensure your iPod® fits properly in the dock on the top of the unit. ® Mini Insert Use with iPod® Mini Thin iPod®s Insert iPod® 3Gen 10-15 GB iPod® 3Gen 20 GB iPod® 4Gen 20 GB iPod® Photo 30 GB Thick iPod®s Insert iPod® 3Gen 30 GB iPod® 3Gen 40 GB iPod® 4Gen 40 GB iPod® Photo 40 GB iPod® Photo 60 GB Nano Insert iPod® Nano 2 GB iPod® Nano 4 GB To Place an Insert Select the insert for your iPod® (see chart above).
OPERATING INSTRUCTIONS Stereo Headphone Jack You may connect stereo headphones (not included) to the Headphone jack on the front panel of this system for private listening without disturbing others. When headphones are connected the speakers are automatically shut off. IMPORTANT: Before you connect your headphones, set the VOLUME control of this system to a low level. Then connect your headphones, put them on and gradually increase the volume to a comfortable listening level.
TROUBLESHOOTING GUIDE PROBLEM POSSIBLE CAUSE SOLUTION GENERAL No sound is heard. No sound is heard. Power is not on. Press the POWER button. VOLUME Control is set to minimum. Adjust the VOLUME Control. Mute is on. Press Mute on remote. RADIO Station has not been tuned properly. Tune station properly . FM reception is weak. Extend the FM cord. Wrong function is selected. Press the FUNCTION button to the radio position. CD All or part of the CD will not play. CD is inserted incorrectly.
TROUBLESHOOTING GUIDE PROBLEM ® iPod does not dock properly iPod ® does not POSSIBLE CAUSE Using no or wrong iPod ® insert. Make sure the dock insert is the ® proper fit for your iPod . iPod ® didnít install properly. Remove your iPod from the dock and check for obstruction on the connectors in the dock and on your ® iPod . Then reseat it in the dock. ® iPod ® is not installed properly.
LIMITED PRODUCT WARRANTY Audio Product / Telecom Product / TV / DVD Product This quality product is warranted to be free from manufacturer’s defects in material and workman-ship, provided that the unit is used under the normal operating conditions intended by the manufacturer. Should any problems arise with this product, it is highly recommended to visit our website at www.curtisint.