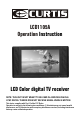
LCD1105A Operation Instruction LCD Color digital TV receiver NOTE: THIS UNIT IS NOT MEANT TO BE USED IN A MOVING VEHICLE. ATSC DIGITAL TUNERS DOES NOT RECEIVE SIGNAL WHEN IN MOTION. This device complies with Part 15 of the FCC Rules. Operation is subject to the following two conditions: (1) this device may not cause harmful interference, and (2) this device must accept any interference received, including interference that may cause undesired operation.
Contents I Precautions 1 II Accessories 2 III Appearance 3 IV Description of Panel Buttons 4 V Remote Controller Directions 5 VI Basic Operation 7 VII TV Menu Operation 8 6.1. TV/AV Image Quality Adjustment 8 6.2. Sound Adjustment 9 6.3. Time Adjustment 9 6.4. Settings 10 6.5.
I Precautions Storage 1. Keep this product away from extremely hot or cold places. The storage temperature ranges from -40 to 60 and the working temperature from -5 to 40 . 2. Do not use this product at damp environment like bathtubs, wash basins, kitchens, washtubs, as well as basements, swimming pools or similar places. 3. Do not expose your TV set to high humidity, dust or oil smoke. 4. Do not throw or drop this product. 5.
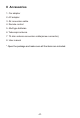
II Accessories 1. Car adapter 2. AC adapter 3. AV conversion cable 4. Remote control 5. AAA type batteries 6. Telescopic antenna 7. 75 ohm antenna conversion cable(screw connector) 8. User manual * Open the package and make sure all the items are included.
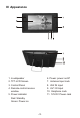
III Appearance 1. Loudspeaker 2. TFT-LCD Screen 3. Control Panel 4. Remote-control receive window 5. Power indicator Red: Standby Green: Power-on 6. Power: power on/off 7. Antenna Input Jack 8. AV2 IN Input 9. AV1 IN Input 10. Earphone Jack 11.
IV Description of Panel Buttons 1. MENU: Menu button, press to show the main menu. When system enters a multilevel submenu, press to return the previous menu step by step. 2. CH+ : Upward selection/Channel increasing. 3. CH- : Downward selection/Channel decreasing. 4. VOL+ : Rightward selection/For volume increasing. 5. VOL- : Leftward selection/For volume decreasing. 6. SOURCE: TV,AV1,AV2 switch. 7. MTS: Language switch button, press to adjust among different languages. 8.
V Remote Controller Operation Instruction 1 9 2 10 11 5 AAA 12 13 14 6 7 8 AAA 3 4 15 16 17 18 1. CH+/CH- (Program choosing key, up and down direction key): Press CH+ key to increase the channel by degree. Press this key and choose menu upward if it is in the system menu. Press CH- key to decrease the channel by degree. Press this key and choose menu downward if it is in the system menu. 2. VOL+/VOL- (Volume control key, left and right direction key) Press VOL+ to turn up the volume.
9. MENU: Menu key. When you press this key, the main menu will display. When the system enters a multilevel submenu, press this key and return to previous menu step by step. 10. PRLIST: TV program menu key. When pressing this key, you will see the entire program list in a program list box. 11. POWER (Power Switching Key): When you press this key, the TV set will be turned off, and press again it will be turned on. 12. EXIT: Exit Key. Press this key, exit operation and return to the program. 13.
VI Basic Operation 1. Connection of Power Supply: Align the power supply plug on AC adapter with the jack on the machine rear cover marked with DC. 2. Connection Of External Antenna: 75 external antenna cord Align one end of the attached external antenna cord plug with the external antenna jack, and the other end to connect the external antenna head. 3.
VII TV Menu Operation 7.1. TV/AV Image Quality Adjustment Personal Picture Mode Contrast 50 Brightness 50 Color 50 Sharpness 50 Tint 0 UP/DOWN ADJUST "MENU": EXIT Press MENU key to enter the menu list and then press left or right key to enter the above list. Press up and down key to choose to enter the sub-list, press left and right key to adjust the numerical value or setup the contents, then press Menu to confirm and return to previous list.
7.2. Sound Adjustment Standard Sound Mode Bass 50 Treble 50 50 Balance English Audio Language UP/DOWN ADJUST "MENU": EXIT Press MENU key to enter the menu list and then press left or right key to enter the above list. Press up and down key to choose to enter the sub-list, press left and right key to adjust the numerical value or setup the contents, then press Menu to confirm and return to previous list.
Press MENU key to enter the menu list and then press left or right key to enter the above list. Press up and down key to choose to enter the sub-list, press left and right key to adjust the numerical value or setup the contents, then press Menu to confirm and return to previous list. Press Menu again or press EXIT key on the remote controller to quit the sub menu list directly after the adjustment of time. Precautions 1. Time Zone has seven areas to be chosen. 2.
7.4.5. Closed Caption Settings Many TV programs contain closed caption information, and the audience can see the caption in words on the screen. Not all the channels at any time have closed caption code information. Press Up and Down Key to choose Closed Caption and press Left and Right Key to enter the following picture.
7.5. Program Searching Press MENU Key to enter the menu list, press Left and Right Key to enter the following list, press Up and Down Key to enter the sub-list and then press Left and Right Key to setup the contents. 7.5.1.1. Antenna can be setup as CATV and Air. Antenna Auto Scan Favorite Show/Hide Channel No. Channel Lable DTV Signal UP/DOWN Antenna Auto Scan Favorite Show/Hide Channel No. Channel Lable DTV Signal UP/DOWN CATV ADJUST "MENU": EXIT Air 4-1 ADJUST "MENU": EXIT 7.5.1.2.
7.5.2. In the Start to scan item, press VOL+ to start searching. Auto searching will clear the primary program. AUTO Cable System Start to Scan DTV Signal UP/DOWN ADJUST "MENU": EXIT After received the programs,the DTV Signal item will show the DTV signal strength. 7.5.3. Choose Favorite item, press Up and Down key to choose program, press Left and Right key to setup favorite program. Antenna Auto Scan CATV Favorite Show/Hide Channel No. Channel Lable DTV Signal UP/DOWN ADJUST "MENU": EXIT 7.5.
No. 4-1 9-2 Program Name FD 3803 KQED-SD SELECT Show "MENU": EXIT 7.5.5. Change Channel Number Choose Channel No. as in the following picture: Antenna Auto Scan Favorite Show/Hide Air Channel No. 4-1 FD 3803 Channel Lable DTV Signal UP/DOWN ADJUST "MENU": EXIT Press VOL+ or VOL- to change current channel number. 7.5.6. Change or Edit Program Name Choose Channel Label and press VOL+ to enter the following picture.
VIII To Receive Clear Image Adjust the length, angle and direction of the telescopic antenna to receive the optimal image. Draw back the antenna beginning from the wide part after using. Warning If the signals are too weak, no matter how to adjust the antenna, the image will not be clear and there are phenomenons like high noise, shaking, and sound not well and so on. It's not the fault of the TV set. If the image quality is not good when using the telescopic antenna, try to use open antenna or cable TV.
IX Before Repair The following phenomenons do not mean that the TV set has fault. Please check it according to the following methods before repair. Phenomenon No image and sound No signal Reason AC adapter or automobile adapter connecting improperly; using unauthorized power; the power switch is on the state of off. Whether chosen the right channel; auto setup receiving channel again; channels need to be reset in a new place.
X Technical Parameter Input ATSC frequency: 54MHz 803MHz NTSC receiving frequency: 55.25MHz 801.25MHz LCD Screen Technical Parameter LCD screen: 11 inch LCD screen scale: 16:9 Resolution: 800(H) RGB 480(V) Response Rate: R: 30/F: 50 Visible Angle: U: 55/D: 65 L/R: 65 Illuminant: CCFL Lamp Life: >10,000 Hours Capability Parameter Power Supply: AC INPUT 100-240V 50/60HZ DC OUTPUT 12V/2A Dimensions: 367 205 63.
XI Stand Assemble Instruction Manual Pict.-1 Pict.-2 Pict.-5 Pict.-9 Pict.-3 Pict.-7 Pict.-6 Pict.-11 Pict.-10 Pict.-13 Pict.-14 Pict.-4 Pict.-8 Pict.-12 Pict.-15 Step one: Pick up the stand accessory from the package as Pict.-1. Step two: Take out the rectangle patch from the stand haead as Pict.-2, Pict.-3 & Pict.-4. Step three: Loose the screw of rectangle patch, and then locked it on the back of the Unit. as Pict.-5 & Pict.-6. Step four: Loose the screw and open the stand head as Pict.
Warning This operation instruction is only intended for reference. No further notice is available to any modification of all information contained therein. Due to continuing improvements, the features and design are subject to change without notice. Warning There is no component that can be repaired in the TV set. Do not try to disassemble and improve the TV set. There is high voltage inside and it is very dangerous. The maintenance and adjustment work should be carried through by professional people.