LCD TV 32" MODEL LCD3227A-2 User's Manual
Contents Caution .................................................................................................................................... 2 Main Unit Descriptions ............................................................................................................ 3 Accessories ............................................................................................................................. 5 Getting Started .....................................................................
Caution The lightening flash with arrowhead symbol, within an equilateral triangle is intended to alert the user to the presence of un-insulated "dangerous voltage" within the products enclosure that may be of sufficient magnitude to constitute a risk of electronic shock to the persons. The exclamation point within an equilateral triangle is intend to alert the user to the presence of important operating and maintenance (servicing).
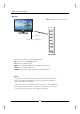
Main Unit Descriptions FRONT NOTE:TV picture is for reference only. Indicator Remote control receiving window The functions of the buttons are described as bellows: CH+/-: Press to choose UP/DOWN channels. VOL+/-: Press to adjust the volume. MENU: Press to display the OSD menu, Press again to exit the menu. INPUT: Press to select the input source. POWER: Turn on and off, carry out the function of standby and turn-on.
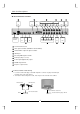
Main Unit Descriptions INPUT AND OUTPUT TERMINAL 6 5 3 8 9 1 AUDIO OUT EARPHONE RF OUT IN USB PC AUDIO PC COMPONENT & AUDIO IN 2 IN IN IN Y 110-240V HDMI1 HDMI2 HDMI3 50/60Hz IN IN IN R PB/CB PR/CR Y PB/CB PR/CR R L L VIDEO COAXIAL COMPONENT & AUDIO IN 1 IN OUT 3 2 4 1 75 ohm Antenna Socket. 2 Video signal receivable. (AUDIO from YCBCR/YPBPR1) 3 YCBCR/YPBPR component signal receivable. 4 HDMI Input. 5 PC analog RGB signal receivable. 6 USB Input.
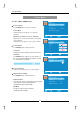
Accessories Please check and identif y the supplied accessories. Remote control ................................................................................................................ x 1 Battery( AAA) ................................................................................................................ x 2 Warranty Card ................................................................................................................. x 1 Instruction Manual .................................
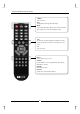
Remote Control Key Functions POWER Turn on/off TV. EPG POWER Display Electronic Program Guide menu . MUTE EPG MUTE Press this button makes input source under silent mode, press again can resume accompanying sound. SAP Show the list of audio languages available for current SAP EXIT CC MENU channel under TV mode,such as left, right, mono and stereo. CC Turn on/off CC.
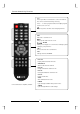
Remote Control Key Functions 0~9 /Press any number of 0~9 buttons to select a TV channel , also can be used in Teletext Page choosing. Press " - " to enter a program number for multiple program POWER MUTE EPG channel, such as 2-1 etc. Return to previous channels after changing channels. EXIT Exit menu or sub menu of TV. MENU Brings up LCD main menu on screen. SAP EXIT CC / ENTER MENU Allows you to navigate on-screen menus and adjust system settings to your preference.
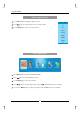
TV Operation Select Input Source Press INPUT button to display the input source list; Press Source Select button to select the input source you want to watch; TV Press ENTER button to enter the selected source.
TV Operation Picture Menu TV / AV / YPbPr / HDMI source. PICTURE Picture Settings Picture Settings Screen Settings Press ENTER button to enter the sub menu. PC Settings Color Temperature Normal Advanced Picture Settings Picture Mode Available picture mode: Movie, User, Dynamic, Standard. MENU Brightness, Contrast, Color, Tint, Sharpness :Return :Select Menu ENTER :Go to Next Menu Only in the User mode, the detail options as following can be adjusted.
TV Operation Noise Reduction Available Noise Reduction: Low, Medium, Off,High. MPEG Noise Reduction It can improve the quality of the pictures by reducing the block noise. (Available MPEG Noise Reduction: Low, Medium, Off,High) PC source. PICTURE Picture Settings Picture Settings menu and description are the same Screen Settings as that for TV source. PC Settings Normal Color Temperature Advanced Picture Settings Screen Settings Press ENTER button to enter the sub menu.
TV Operation Sound Menu SOUND menu and description are the same as that SOUND for TV .But The settings for Analog Sound and Digital Sound Settings Sound are invalid in AV / YPbPr / HDMI / PC source. Surround Mode Analog Sound SAP Sound Settings Digital Sound English Press ENTER button to enter the sub menu. Other Settings Equalizer Settings Sound Mode Available Sound Mode: User, Dynamic, Standard, Soft.
TV Operation Channel Menu NOTE: CHANNEL This menu is only shown when the input source is TV . Channel List Favorite List Channel Setting Channel List Signal Type Air Press ENTER button to scan the Channel List. If you select Auto Channel Search Execute the option “In Channel List” On, the channel label will display. MENU :Return :Select Menu ENTER :Go to Next Menu Favorite List Press ENTER button to scan the Favorite Channel List.
TV Operation Parental Control PARENTAL menu and description are the same as PARENTAL CONTROL that for TV source. Input password to enter, default password is “0000”. Lock Parental Control V-CHIP V-CHIP Change Password Press ENTER button to enter the sub menu. Front Panel Lock Source Lock US V-CHIP MENU Press ENTER button to enter the sub menu.
TV Operation CANADA V-CHIP The operation of CANADA V-CHIP is the same as the operation of US V-CHIP. Block UnRated Show Press ENTER button to set the rating locked. Downloadable Rating Prress ENTER button to set the rating. If the DTV program doesn't have this rating information, this option will be in gray. Clear Downloadable Data Press ENTER button to set the rating . NOTE: The above two operation only valid when playing the downloadable data stream. The operations are the same as US V-CHIP.
TV Operation Setup Menu SETUP menu and description are the same as that SETUP for TV source. But the setting for Closed Caption Closed Caption is invalid in HDMI/PC source . Menu Language English Sleep Timer Off Clock Closed Caption Press ENTER button to enter the sub menu. Caption Display MENU Select ON or OFF. :Return :Select Menu ENTER :Go to Next Menu Analog Caption Type Available type: TEXT1,TEXT2,TEXT3,TEXT4,CC1, CLOSED CAPTION CC2,CC3,CC4.
TV Operation Menu Language Available Language: English,French,Spanish, Deutsch. Sleep Timer Let you select amount of time before your TV turn itself off automatically. Clock CLOCK Press ENTER button to enter the sub menu. Time Zone Alaska Time Zone Auto Clock Off Available Size: Hawaii, Alaska, Eastern,Central, Setup Time 2009-10-21 20:00:00 Mountain, Pacific,Samoa,Newfoundland,Atlantic. Day Of Week Wed Auto Clock Set it On or Off.
TV Operation Others Menu OTHER menu and description are the same as that for TV source. OTHERS Blue Back No Signal Power Off Blue Back No Operation Power Off Press ENTER button to select when there is no signal, All Reset whether set the background in blue or not. Execute Audio Only No Signal Power Off Press ENTER button to select it On or Off. When set it MENU :Return On and there is no signal input, it will turns off the panel and the LED light turns red.
Wall Mount Install Ation INSTALLING / REMOVING THE BASE STAND WARNING : The LCD Display is very fragile , and must be protected at all times when removing the base stand. Be sure that no hard or sharp object or anything that could scratch or damage the LCD display comes into contact with it. Do NOT exert pressure on the front of the unit at any time because the screen could crack . 1. Disconnect all cables or cords connected to the unit. 2.
Specifications Television RF system NTSC M+ATSC Video Color System PAL/NTSC Channel and frequencies AIR CH2-CH69 CABLE CH1-CH135 Power input AC 110-240V, 50/60 Hz Power consumption see the ration label Audio output 6W +6W (Rated output) Simple Troubleshooting If the display fails or the performance dramatically, check the display in accordance with the following instructions. Remember to check the peripherals to pinpoint the source of the failure.