LCDVD152UK USER’S GUIDE
LCD TV Safety Warnings Damage Never use your TV if it is damaged in any way. Always place your TV on a flat level surface avoiding anywhere which may be subject to strong vibration. Weather It is advisable to unplug the aerial during an electrical storm. Temperature Avoid extremes of temperature, either hot or cold, place your TV well away from heat sources such as radiators or gas/electric fires. Naked Flames Naked flames such as candles and night lights should not be placed on or near your TV.
Packaging If you can store the packaging it will prove useful should you need to transport the TV to protect it while it is in transit. Try to reuse packaging wherever you can. If you cannot store it, contact your local authority for details of your nearest recycling facilities. Installation We strongly recommend that this product is installed by qualified personnel with enough skill and competence.
CONTENT ACCESSORIES ----------------------------------------------------------------- 1 FRONT PANEL BUTTONS--------------------------------------------------- 2 BACK PANEL OVERVIEW--------------------------------------------------- 3 BRIEF FOR BACK TERMINALS----------------------------------- 4 REMOTE CONTROL----------------------------------------------------------- 5 REMOTE CONTROL BUTTON FUNCTIONS ------------------ 6 CONFIGURATION OF THE LCD-------------------------------------------- 7 POWER ON/OFF----
ACCESSORIES ACCESSORIES Thank you for purchasing this LCD-TV. This LCD-TV package comes with: User’s Guide book Remote control Battery AAA x 2 Adapter Power Cord/External Power Supply Warranty Card x 1 OPTIONAL ACCESSORIES You can purchase these optional accessories for your LCD TV: HDMI Cable AV Cable SCART Cable VGA Cable Audio Cable Please save your packaging as you will need this in the event of warranty/service repair or support.
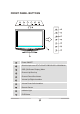
FRONT PANEL BUTTONS 10 1 POWER 2 SOURCE 3 MENU 4 CH+ 5 CH- 6 VOL+ 8 7 VOL- 9 1 Power ON/OFF 2 Select the input source:DTV/TV/SCART/YPBPR/DVD/PC-RGB/HDMI/AV 3 OSD (ON Screen Display) Menu 4 Channel Up/Scroll up 5 Channel Down/Scroll down 6 Volume Up/Right orientation 7 Volume Down/Left orientation 8 Remote Sensor 9 Indicator Light 10 DVD Button
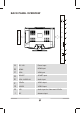
BACK PANEL OVERVIEW Top/Label Side Of Disc DC 12V A HDMI B VGA C SCART D VGA AUDIO IN E Y PB F PR VIDEO G L H R RF A DC 12V Power input B HDMI HDMI input C VGA VGA input D SCART SCART input E VGA AUDIO IN Audio input F YPBPR YPBPR input G VIDEO VIDEO input H L/R Audio input for Video and Y/PB/PR I RF Antenna input I
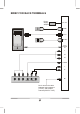
BRIEF FOR BACK TERMINALS Power Supply Adapter DC 12V HDMI HDMI VGA SCART SCART VGA AUDIO IN Y PB PR VIDEO L R L Y PB PR R RF VIDEO Audio Out Don’t remove the cable between Indoor antenna (TV RF ) and Outdoor antenna (DVB R F-OUT)
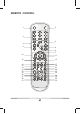
REMOTE CONTROL 1 2 3 4 5 i 6 NICAM SOURCE VOL CH 8 9 7 10 OK 11 EXIT MENU 13 12 14 15 18 19 22 23 26 27 30 31 FAV EPG SUBT LIST TEXT HOLD PGDN PGUP DVD INDEX SIZE REPEAT ANGLE REVEAL SUBPAGE L/R SLEEP TV-RADIO AUDIO SET UP P-MODE 17 16 21 20 25 24 29 28 33 32
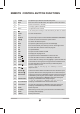
REMOTE CONTROL BUTTON FUNCTIONS 1 POWER The power key to switch On and Off of the power 2 MUTE Press once to turn off the sound, once again to restore the sound 3 0-9 Select TV channels in TV mode 4 i To display system information 5 VOL+/- To adjust the sound volume 6 7 In TV mode, press this key to come back to the previous TV channel NICAM To select sound modes 8 CH+/- To select the previous or next TV channel 9 SOURCE To cycle through the input source:DTV/TV/SCART/YPBPR/DVD/PC-RGB/
CONFIGURATION OF THE LCD Note: generally, you can press MENU to return to previous menu, and EXIT to exit the menu, it is a default option. POWER On/Off Plug the TV into a standard outlet, making sure the output voltage and frequency corresponds to the requirement of your machine. When the power supply is connected, the red indicator on the front panel will be on and the machine turns into standby state.
CONFIGURATION OF THE LCD Channel Menu - Press MENU to display the OSD menu to select the menu Channel. - Press to select the selection, or OK to confirm. - Press MENU to return to previous menu. - Press EXIT to exit the menu. Auto Tuning - Press to select the country, then OK to confirm.
CONFIGURATION OF THE LCD - Press to select start highlight. Press OK key to start Auto Tuning. - Press
CONFIGURATION OF THE LCD ATV Manual Tuning - Press to select the selection, the following suboptions. to adjust the option as requirement. See details in - Press SAVE (RED) to save the channel. Storage To - Press to select the channel number you want to save to. System - Press to select the system. Current CH - Press to select the current channel. Search - Press to search backward/forward, MENU or EXIT to stop the searching.
CONFIGURATION OF THE LCD Program Edit TV 1 S-02 TV 2 C-42 TV 3 S-03 TV 4 S-04 RENAME MOVE DELETE SKIP FAV Delete - Press to select the channel you want to delete, then press DELETE (RED), and the channel will be marked DELETE, press DELETE (RED) again to delete, or MENU to cancel. Rename(only for ATV) - Press to select the channel you want to rename, press RENAME (GREEN), the channel will be marked RENAME, then press to select the position of word, press to select the letter you want.
CONFIGURATION OF THE LCD Picture Menu - Press MENU to display the OSD menu to select the menu PICTURE, - Press MENU to return to the main menu from the submenu. Picture Mode - Press to select Picture Mode. Dynamic, Standard, Mild, User. Contrast - Press to adjust the contrast. Brightness - Press to adjust the brightness. Color - Press to adjust the color. Sharpness - Press to adjust the sharpness. Color Temperature - Press to select Color Temperature. Cool, User, Warm, Medium.
CONFIGURATION OF THE LCD Sound Menu - Press MENU to display the OSD menu to select the menu SOUND, to enter the submenu. - Press MENU to return to the main menu from the submenu. Sound Mode - Press to select sound mode. Standard, Music, Movie, Sports, User. Press MENU to confirm and return to preview menu. Treble - Press to adjust the treble. Bass - Press to adjust the bass. Balance - Press to adjust the balance. Auto Volume - Press to select off or on.
CONFIGURATION OF THE LCD Time Menu - Press MENU to display the OSD menu, to select the menu TIMER, - Press MENU to return to the main menu from the submenu. Clock - Press to select hour or minute, press setup the time. to Off Time - Press to select on, to enter the setup item, use to setup the time you want the TV to be turn off. OnTime - Press to select on, to enter the setup item, use to setup the time you want the TV to be turn on. to enter the submenu.
CONFIGURATION OF THE LCD Sleep Timer - Press to select timer. Auto Standby - Press to select standby on or off. Option Menu - Press MENU to display the OSD menu, to select the menu OPTION, - Press MENU to return to the main menu from the submenu. Language - Press to select the OSD language. Hearing Impaired - Press to On/Off the OSD Hearing Impaired. Restore Factory Default - Press restore factory default. to enter the submenu.
CONFIGURATION OF THE LCD Lock Menu - Press MENU to display the OSD menu, to select the menu Lock, - Press MENU to return to the main menu from the submenu. - Press enter Password is “0000”. Lock Channel - Press to select off or on. Set password - Press display please enter password new password and confirm. Block Program - Press display to enter Block Program, press Lock (GREEN). to enter the submenu.
CONFIGURATION OF THE LCD EPG Menu - Use EPG button on the remote control to display the EPG menu directly as below: -Press DATE (YELLOW) to enter Date Option, press to select Date. Fast Channel List - Press LIST button on the remote control to display the channel List.
CONFIGURATION OF THE LCD Input Source - Press SOURCE to display the OSD input source, to select the menu source. TV SCART YPBPR DVD PC-RGB HDMI AV Favorite List Favorite List DTV 800 SZTVM01 DTV 801 SZTVM02 - Press FAV button on the remote control to display the Favorite List.
CONFIGURATION OF THE LCD Subtitle Language Subtitle Language TTX Off English - Press SUBT button on the remote control to display the Subtitle Language. Audio Language Audio Language MPEG English DOLBY UND CE L R - Press NICAM button on the remote control to display Audio Language. If there are several language, you can use button to select the language.
TECHNICAL SPECIFICATION LCD TV LCD Input Signal Resolution Speaker Output Power Adapter Output Power Adapter Input Type 15.6’’ PC-RGB Horizontal frequency:20-70KHz Vertical frequency:60Hz RF 75 ohm Antenna/PAL-SECAM/DVB-T Video 1 AV/Composite RCA,1 YPB P R 1 SCART Audio 1 pair 3.5mm Phone Jack for PC 1 pair RCA for AV HDMI 1 HDMI Recommended 1366X768 2X2W Voltage 12V DC Voltage AC 100-240V 50/60Hz 1.0A Brightness 250 cd/m2 Contrast 500:1 4.
SAFETY PRECAUTIONS This LCD TV is manufactured and tested to ensure the user s safety. Improper use or installation may result in danger to the LCD TV as well as to the user. Carefully adhere to the following warnings and keep this user guide to hand for future reference. WARNINGS This LCD TV should be operated only at the correct power sources indicated in the label . If you’ re unsure of the power supply in your residence, consult your local dealer or service center.
CARE AND MAINTENANCE Care Avoid exposing your LCD TV directly to sunlight other heat source. Place your LCD TV away from the sun to reduce glare. Put your LCD TV in a well ventilated area. Do not place anything heavy on top of your LCD TV. Make certain your LCD TV is installed in a clean and moisture-free area. Keep your LCD TV away from magnets, motors, transformers, speakers, and other TV sets.
202750323