Model:PLDVD3213A
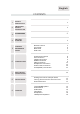
English CONTENTS 1 SAFETY PRECAUTION 1 2 IMPORTANT SAFETY INSTRUCTION 2 3 ACCESSORIES 3 4 GETTING STARTED 3 5 CONTROL REFERENCE GUIDE 6 CONNECTIONS 7 WALL MOUNT INSTALLATION 8 9 Remote Control Front View Back View Side View Antenna Connection AV Connection YPbPr Connection HDMI Connection VGA Connection Headphone Connection Power Cord Connection Coax(SPDIF) Connection 4 6 6 7 8 8 9 9 10 10 10 11 12 INITIAL SETUP Putting The Unit On A Proper Place Turning The Unit On For The First
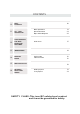
CONTENTS 10 DISC FORMATS 11 CD / DVD OPERATION Basic Operations Special Functions Mp3 / JPEG Playback 21 24 26 12 CUSTOMIZING THE DVD FUNCTION SETTINGS DVD Menu 27 13 MAINTENANCE 14 DISPLAY MODE 15 SPECIFICATION 16 TROUBLESHOOTING GUIDE 20 29 PC Formats Video Formats 30 30 32 DVD Symptom TV Symptom SAFETY CLASS :This is an IEC safety class I product and it must be grounded for safety.
SAFETY PRECAUTION * CAUTION MARKING WAS LOCATED AT THE REAR PLACEMENT INFORMATION OF THE APPARATUS. • Do not use this unit in places that are extremely hot, cold, dusty or humid. • Do not restrict the airflow of this unit by placing it somewhere with poor airflow, by covering it with a cloth, by placing it on bedding or carpeting. SAFETY INFORMATION • When connecting or disconnecting the AC power WARNING:TO REDUCE THE RISK OF ELECTRIC cord, grip the plug and not the cord itself.
IMPORTANT SAFETY INSTRUCTIONS 1)Read these instructions. 2)Keep these instructions. 3)Heed all warnings. 4)Follow all instructions. 5)Do not use this apparatus near water. 6)Clean only with a dry cloth. 7)Do not block any ventilation openings. Install in accordance with the manufacturer's instructions. 8)Do not install near any heat sources such as radiators, heat registers, stoves, or other apparatus (Including amplifiers) that produce heat.
ACCESSORIES Please check and identify the supplied accessories. Remote control .................................................................................................................. x 1 Battery(AA) ............................................................................................................ ......... x 2 Warranty Card ................................................................................................................ x1 Instruction Manual ...........................
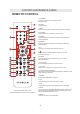
CONTROL REFERENCE GUIDE REMOTE CONTROL 1.STANDBY To switch on the TV or make the TV into standby mode. 1 2 2.EJECT To eject a disc. 3 3.INFO Show the information of the program you are watching. 4 4.SOURCE Press this button to select an input source. 5 7 6 8 12 6.SMODE Press this button to select sound setting for different sound effects. 11 7.0-9 Allows you to change the channel of the TV. 9 10 13 15 16 14 19 18 17 20 21 23 22 27 26 31 30 24 FAV EPG 5.
CONTROL REFERENCE GUIDE REMOTE CONTROL 16.ENTER Press to confirm selections on a menu screen. 17.D.SETUP Press this button to show the DVD SETUP menu. 1 2 18.Play/Pause Press this button to play or pause the DVD you’re watching. 3 19.Exit Press this button to exit the on screen display. 4 Stop Press this button to stop playing the DVD you’re watching. 5 20.MUTE Press this button to mute or restore sound. 7 6 8 9 21.AUDIO Press this button to change the audio language of the DVD. 12 22.
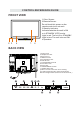
CONTROL REFERENCE GUIDE FRONT VIEW 1.Color Screen 2.Remote Sensor Do not block this sensor or the remote control will not work. 3.Standby Indicator Indicates whether the unit is ON or in STANDBY (OFF) mode. Light in red: The unit is in STANDBY. Light in blue :The unit is turned ON. 4.Speakers 2 3 4 1 4 BACK VIEW 1.Power Cord 2.Headphone Jack 3.Service Port 4.HDMI IN Jacks 5.PC ADUIO IN Jack 6.VGA IN Jack 7.TV ANTENNA Terminal 8.Coax OUT Jack 9.AV IN Jack 10.COMPONENT IN Jack 11.
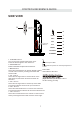
CONTROL REFERENCE GUIDE SIDE VIEW 9 8 VOL+ 7 VOL- 6 CH+ 5 CH- 4 MENU 3 SOURCE 2 STANDBY 1 8. 1. STANDBY Button Turn on the TV by pressing the button once. Press to eject a disc. Press the button again to turn off the TV. 2. SOURCE Button Press this start pause or resume playback of Press to select the input source of the TV. a disc. 3. MENU Button This button activates the On Screen Display (OSD). 9.
CONNECTIONS CONNECTING A TV ANTENNA / CABLE / SATELLITE To view television channels correctly, a signal must be received from one of the following sources: - An indoor or outdoor aerial antenna - A cable system - A satellite system NOTE For receiving over-the-air TV broadcasts, we recommend that you use an external fixed antenna. Should you require the use of a temporar y antenna, please ensure that you purchase an antenna with sufficient ability to receive in weak signal areas.
CONNECTIONS CONNECTING A HIGH-DEFINITION (HD) SOURCE USING COMPONENT CONNECTION High-Definition (HD) Devices with component video output must be connected to the YPbPr input. Connect the component video cable and audio cable (not included) as shown. Make sure you connect the component video cable and audio cable from the other equipment (COMPONENT OUT and AUDIO OUT)to the unit COMPONENT IN.
CONNECTIONS CONNECTING A PC Connect the 15-pin D-SUB PC/VGA connector from your computer to the 15-pin D-SUB PC/VGA input on this unit using a monitor cable and an audio cable (not included) as shown. Make sure you connect the cable from the computer ( VGA and AUDIO - PC OUT ) to this unit ( VGA and AUDIO - PC IN ). TO AUDIO OUT jacks TO PC Connector NOTE • Insert the power plug fully into the socket outlet . ( If the power plug is loose , it could generate heat and cause fire .
CONNECTIONS Connection to a Home Theater Audio System For BEST audio performance Connecting to a Home Theater System Dolby Digital can deliver optimal 2 channel stereo or surround sound with five discrete full range channels plus a sixth channel for a subwoofer. Enjoy optimal sound reproduction from your system with a Dolby Digital amplifier that incorporates a digital coaxial input. Connect an optional digital cable directly to the television’s Coax audio output to listen through all inputs except VGA.
WALL MOUNT INSTALLATION INSTALLING / REMOVING THE BASE STAND , WARNING : The TV D isplay i s v ery f ragile and m ust b e p rotected a t a ll t imes w hen r emoving t he b ase Stand . Be sure that no hard or sharp object or anything that could scratch or damage the TV display comes into contact with it . Do NOT exert pressure on the front of the unit at any time because the screen could crack . 1. Disconnect all cables or cords connected to the unit . 2 .
INITIAL SETUP PUTTING THE UNIT ON A PROPER PLACE When you turn on your television set for the first time, be sure to place it on a solid stable surface. To avoid danger, do not expose the TV to water, or a heat source (e.g. lamp, candle, radiator). Do not obstruct the ventilation grid at the rear and be sure to leave sufficient gaps around the unit. TURNING THE UNIT ON FOR THE FIRST TIME After you have initially connected your TV antenna or cable, turn the television ON.
T V SETUP CHANNEL MENU Press MENU button to display the main menu. Press ◄ / ► button to select CHANNEL in the main menu,it will highlight the first option. 12 6 Picture Sound Air /Cable Tim e Setup LOCK CHANNEL Air Auto Scan Favorite Channel List Show Hide Channel Noumber Channel label Move Select MENU Exit AIR / CABLE This feature allows you to switch between air (such as using antenna) and cable. AUTO SCAN This feature searches channels automatically for you.
T V SETUP PICTURE MENU Press MENU button to display the main menu. Press ◄ / ► button to select PICTURE in the main menu,it will highlight the first option. 12 6 Picture Sound Picture Mode Tim e Setup Standard Brightness 50 Contrast 50 Color 50 Tint 0 50 Sharpness Color Temperature Normal Advanced Settings Move Select MENU Exit PICTURE MODE This feature changes various color modes for the TV. BRIGHTNESS This feature changes the picture's detail in dark colors.
T V SETUP SOUND MENU Press MENU button to display the main menu. Press ◄ / ►button to select SOUND in the main menu,it will highlight the first option. 12 6 Picture Sound Tim e Setup Equalizer Settings Mono MTS Audio Language English Digital Audio Output PCM Surround Sound Off AVL Off Move Select MENU Exit EQUALIZER SETTINGS This feature enables the internal equalizer of the speakers. You can adjust the settings individually or use the presets (standard, music, movie, sports, user).
T V SETUP TIME MENU Press MENU button to display the main menu. Press ◄ / ►button to select TIME in the main menu,it will highlight the first option. 12 6 Picture Sound Tim e Setup Off Sleep Timer Pacific Time Zone Off Daylight Saving Time 24-hour Time Format Off Auto Clock 1980/01/06 00:00 Clock Move Select MENU Exit SLEEP TIMER This timer automatically turns off the TV at the designated time. TIME ZONE This option adjusts the global time zone for the TV.
T V SETUP SETUP MENU Press MENU button to display the main menu. Press ◄ / ► button to select SETUP in the main menu,it will highlight the first option. 12 6 Picture Sound Audio Menu Language Time Setup Lock Channel English Transparency Transparent Off 25% ZoomTimeout OSD Mode 60 Normal Sec.
T V SETUP LOCK MENU Press MENU button to display the main menu. Press ◄ / ► button to select LOCK in the main menu,it will highlight the first option. Press “0000” for the lock password. 12 6 CHANGE PASSWORD This option allows you to change the LOCK menu password. SYSTEM LOCK This option enables parental locking and filtering for the TV. US RATING This option filters US TV programming and movies. CANADA RATING This option filters CANADA TV ratings.
DISC FORMATS ICONS USED ON DVDs NOTES ON COPYRIGHT It is forbidden by law to copy, broadcast, show, broadcast on cable, play in public or rent copyrighted material without permission. Apparatus Claims of U.S. Patent Nos. 6,836,549; 6,381,747; 7,050,698; 6,516,132; and 5,583,936 licensed for limited viewing uses only. DVDs are copy protected, and any recordings made from these discs will be distorted. This product incorporates copyright protection technology that is protected by method claims of certain U.
Insert the disc to the disc slot (mirror side of the disc has to face yourselef),the player SKIP (PREVIOUS/NEXT) 21
22
23
2.You can directly press 0-9 number button to highlight a chapter/track.If you want the chapters / tracks greater than 10,you can press the 10+ button and press the corresponding number button(s) for the chapter/track you want.
25
26
27
28
29
DISPLAY MODE PC FORMATS Res o l ut io n 640 X 480 H or i z o nt a l Sc an ning F r eq u en cy (KHz) Vert i c a l Sc an n i n g Fr e qu e ncy (Hz) Format 31. 5 8 00 X 600 8 00 X 6 0 0 1 024 X 7 68 1360 X 768 4 7. 7 NOTE: This product does not support the display mode not listed above. In order to achieve the best display effect, please select the above-listed 5 display modes input signal.
DISPLAY MODE VIDEO FORMATS SUPPORTED COMPONENT / HDMI INPUT MODE Res o lu t ion Horizontal Scanning Frequency Vertical Scanning Frequency (Hz) Format 720 X 480 31. 47 59. 94 480 i 720 X 480 15. 734 59. 94 480 p 1280 X 720 37. 5 50 720 p 1280 X 720 45 60 720 p 1920 X 1080 31. 25 50 1080 i 1920 X 1080 33. 75 60 1080 i 24 1080 p 1920 X 1080 27 1920 X 1080 56. 25 50 1080 p 1920 X 1080 67.
SPECIFICATION Model Description Panel Systems Panel Type Diagonal Size Screen Format Resolution Brightness Contrast View Angle Response Time Maximum Color Color System Sound System Audio System Sound Output LED Panel 32 inches 16:9 1366 x 768 320cd/㎡ 3000:1 176(H)/176V) 7 ms 16.7M colors ATSC/QAM/NTSC M BTSC RF Input 75 ohm external terminal Video: 480i, 480p, 720p, 1080i, 1080p. Audio: Two channel linear PCM 32, 44.1 and 48kHz, 16, 20 and 24 bits D-sub 15pin G: 0.7Vp-p, 75ohms B: 0.
TROUBLESHOOTING GUIDE SYMPTOM CAUSE (AND REMEDY ) No power. • Make sure the power cord is connected. • Turn on the unit. The remote does not function. • Remove any obstacles between the remote and the unit. • Use the remote near the unit. • Point the remote at the remote sensor on the unit. • Replace the batteries in the remote with new ones. DVD No sound or only a very low-level sound is heard. • Make sure that you’ve selected DVD mode. • The system is in pause mode.
TROUBLESHOOTING GUIDE SYMPTOM TV Bad Picture (snow, multiple images distortion,blurry) No sound. CAUSE (AND REMEDY ) • • • • • Check the location of the antenna and adjust it if necessary. Make sure the antenna cable is firmly connected. Make sure all input cables are firmly connected. Increase the volume. Check whether the mute function has been activated on the Remote Control. Black and White picture. • Check the PICTURE setting within the PICTURE menu.