MODEL NO.
SAFETY INSTRUCTIONS CAUTION LASER SAFETY: This unit employs a laser. Only qualified service personnel should attempt to service this device due to possible eye injury. CAUTION: USE OF CONTROLS, ADJUSTMENTS OR PERFORMANCE PROCEDURE HEREIN MAY RESULT IN HAZARDOUS RADIATION EXPOSURE. RISK OF ELECTRIC SHOCK DO NOT OPEN CAUTION: TO REDUCE THE RISK OF ELECTRIC SHOCK, DO NOT REMOVE COVER (OR BACK). NO USER-SERVICEABLE PARTS INSIDE. REFER SERVICING TO QUALIFIED SERVICE PERSONNEL.
PREPARATION FOR USE Unpacking and Setup • Carefully remove the unit from the display carton and remove all packing material from the unit itself. • The detachable AC power cord is packed in the carton separately from the unit. Make sure the AC power cord is not accidentally discarded with the carton or packing material. • Press the CD Door OPEN/CLOSE area to open the CD compartment door.
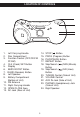
LOCATION OF CONTROLS 1. 2. 3. 4. 5. 6. 7. 8. 9. 10. 11. 12. 13. 14. 15. 16. 17. 18. Left Carrying Handle Disc Compartment Function Control (OFF/CD/FM ST/AM) CLK (Clock) SET Button Display BASS BOOST Button RAND (Random) Button Left Speaker Battery Compartment (Bottom of Unit) FM Antenna Right Carrying Handle OPEN/CLOSE Area AC Jack (Rear of Unit) 19. 20. 21. 22. 23. 24.
OPERATION Make sure the Function control is set to OFF.
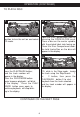
OPERATION (CONTINUED) LISTENING TO THE RADIO 1 2 Rotate the Function control to the AM or FM ST position to turn the unit on and select AM or FM ST (Stereo); the band and the frequency will appear in the display. Tune a desired station by turning the TUNING control. 1 1 3 4 1 2 2 1 Adjust the VOLUME control 1 and BASS BOOST button 2 as desired. Press the BASS BOOST button 2 to the “in” position to enhance the bass sound. To turn the radio off, rotate the Function control to the OFF position.
OPERATION (CONTINUED) TO PLAY A DISC 1 2 Rotate the Function control to the CD position to turn the unit on and select CD mode. Open the Disc Compartment door by pressing the OPEN/CLOSE area. Place a disc on the center spindle, with the printed label side facing up. Close the Disc Compartment door; the total tracks/files on the disc will appear in the display.
OPERATION (CONTINUED) TO PLAY A DISC (CONTINUED) 5 2 1 Adjust the VOLUME control 1 and BASS BOOST button 2 as desired. Press the BASS BOOST button 2 to the “in” position to enhance the bass sound. 6 7 1 2 1 2 To skip forward or backward through the tracks on the disc, press the Skip/Search 1 or 2 button. To search forward or backward through the playing track, press and hold the Skip/Search 1 or 2 button; a chattering noise will be heard. Stop pressing the button to return to normal playback.
OPERATION (CONTINUED) NOTES: • As each track is played, the track number is shown in the display. • To prevent damage to the disc, never open the Disc Compartment door while the disc is rotating. Wait for the disc to stop before opening the Disc Compartment door. Never touch the lens when the Disc Compartment door is open. • DO NOT use the carrying handles when playing a disc. The unit should only be used on a steady surface.
OPERATION (CONTINUED) TO REPEATEDLY PLAY BACK ONE/ALL TRACKS 1 1 2 2 4 3 1 To repeat a single track, press the REPEAT button 1 once while in the Stop mode; “REP” will appear in the display. Press the Skip/Search 2 or 3 button to select the specific track/file that you wish to repeat. When the desired track number appears in the display press the PLAY/PAUSE button 4 to begin playback.
OPERATION (CONTINUED) 1 Rotate the Function control to the CD position to turn the unit on and select CD mode. Insert a disc 1 Press the PROG button; “PROG” and “00” will blink in the display.
OPERATION (CONTINUED) NOTES ON PROGRAMMED PLAY: • Programming is the ability to preselect the order in which a series of tracks will be played. • As each track is played, its track number will be displayed. You can move forward or backward through the programmed tracks with the Skip/Search • The unit will stop after all programmed tracks have been played or the STOP ( ) button is pressed. • To clear the Program memory, while in the Stop mode, press the STOP ( ) button.
TROUBLESHOOTING GUIDE Should this unit exhabit a problem, check the following before seeking service: Symptom Possible Cause Solution Station not tuned properly for AM or FM. Retune the AM or FM broadcast station. FM: Antenna Wire is not extended. Extend FM Antenna Wire. AM: Unit is not positioned correctly. Rotate unit until best reception is obtained. Volume at minimum. Increase volume. CD is not installed or installed incorrectly. Disc is dirty or scratched. Insert CD with label facing up.
SPECIFICATIONS GENERAL: Power Source ..............................................................................120V, 60Hz AC Battery...........................................................DC 12V, 8 x 1.5V ‘C’ size batteries Alkaline is recommended for longer life Speaker. ....................................................................................................2 x 3W Output Power ............................................................................................
LIMITED PRODUCT WARRANTY This quality product is warranted to be free from manufacturer’s defects in material and workman-ship, provided that the unit is used under the normal operating conditions intended by the manufacturer. Should you have any problem with this product, please and it is highly recommended to visit our website at www.curtisint.