RCD-718 COMPACT DIGITAL AUDIO INSTRUCTION MANUAL
TABLE TABLE OF CONTENTS CONTENTS This instruction manual is important to you. Please read it. In a short time it shows exactly how to connect, operate and adjust this unit for best performance. It can save you money. It shows simple things to do and check before you call for help and save the cost of unnecessary service and call out charge. TABLE OF CONTENTS..............................................................................................................1 WARNINGS...............................
WARNINGS TO Prevent fire or shock hazard, do not use this plug with an extension cord, receptacle or add other outlet unless the blades can be can be fully inserted to prevent blade exposure. To prevent fire or shock hazard, do not expose this appliance to rain or moisture.
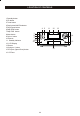
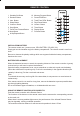
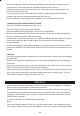
LOCATION OF CONTROLS 1.Standby button 2.CD button 3.Tuner button 4.Stop button/AM-FM selector 5.Play/Pause button 6.Skip REW button 7.Skip FWD button 8.Mute button 9.Colour button 10.Phones 11. Standby Indicator 12. LCD Display 13.Sensor 14.Volume+/- button 15.CD Eject (Open/Close) button 16.
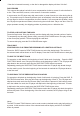
REMOTE CONTROL 1 2 3 4 5 6 7 8 9 Standby/On Button Random Button Intro Button Sleep Button Volume+ Button Stop Button Track/Tune Forward Button Mute Button M-Up/Repeat Button 10 11 12 13 14 15 16 17 Memory/Program Button Preset EQ Button Track/Tune REW Button Play/Pause Button Volume- Button Timer Button Display Button Function Button 1 17 2 16 3 15 4 14 5 13 12 6 7 11 8 10 9 INSTALLATION BATTERY The remote control use 1 power source, CELL BATTERY (CR 2025, 3V).
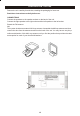
PREPARATION FOR USE Remove the unit carefully from the box, retaining the packaging for future use. Read these instructions carefully before use. CONNECTIONS Connect the speakers to the speaker sockets on the back of the unit. Connect the right speaker to the right socket and the left speaker to the left socket. Extend the FM antenna. AM This system includes an external AM Loop antenna. Assemble the AM loop antenna and then connect the wire from the antenna terminal on the back of the set.
SPEAKER Speaker may be placed away from the main unit by unwinding the speaker cable. AC POWER OPERATION This unit is designed to operate on 120V, 60Hz current only. Connecting it to other power sources may damage the unit. Press the STANDBY/ON button to switch the unit on or off. Disconnect the power cord from the mains supply if the unit is not going to be used for some time. You may need to reprogram any memory settings.
LISTENING TO THE RADIO OPERATION Press the STANDBY/ON button to turn the unit on. Select the Tuner function by pressing the Tuner button on the panel of the main unit. Select the desired frequency band that your station is on (FM, AM) with the STOP button on both main unit and remote control. Tune to the desired radio station by pressing the TUNING FWD/REW buttons on the remote control.
Never use chemicals such as record sprays antistatic sprays, benzene, or thinners to clean compact discs. These chemicals can irreparably damage the disc's surface. Discs should be returned to their cases after use. This avoids serious scratches that could cause the Laser pickup to skip. Do not expose discs to direct sunlight, high humidity, or high temperatures for extended periods. Long exposure to high temperatures can warp the disc.
If the disc is inserted incorrectly, or the disc is damaged the display will show "No disc". DISC ERRORS This compact disc player has built-in error compensation circuits to correct for minor defects in a disc. There are limits, however, to the amount of correction available. In some cases, the CD player may skip some tracks, or parts of tracks, on a disc during disc play.
TRACK SEARCH You can search through the track by holding SKIP FWD or REW button down; normal play will resume when the button is released. FOR REPEAT DISC PLAY OF A SINGLE TRACK Press the Repeat button one. The REPEAT will displayed and flash. Press the Play/Pause button. The selected track will then begin playing through to its end of the track that you have selected and then will return to the beginning of that track. This will continue until the Stop button is pressed.
Continue entering tracks in this way until all the desired tracks are stored (up to 20). Notes: If the PLAY/PAUSE Button is pressed before the PROGRAM Button is pressed to store a track, the track will not be programmed, and the disc will start playing from the first selected track. Any track can be programmed to play more than once. Repeatedly pressing the PROGRAM button will enable you to check the program if required LISTENING TO PROGRAMMED TRACKS 1.
AC CONNECTION Plug the power cord into an AC outlet having 120v, 60Hz only. Connecting this unit to other power sources may damage the unit. NOTES: *The AC polarized to help minimize the possibility of electric shock. If the polarized plug does not fit into a nonpolarized AC outlet, do not file or cut the wide blade; it is the user`s responsibility to have an electrician replace the obsolete outlet.