SRCD-719 INSTRUCTION MANUAL
WARNING TO PREVENT FIRE OR SHOCK HAZARD, DO NOT USE THIS PLUG WITH AN EXTENSION CORD, RECEPTACLE OR OTHEROUTLET ULESS THE BLADES CAN BE FULLY INSERTED TO PRESENT BLADE EXPOSURE. TO PREVENT FIRE OR SHOCK HAZARD. DO NOT EXPOSE THIS APPLIANCE TO RAIN OR MOISTURE. TO PREVENT ELECTRICAL SHOCK, MATCH WIDE BLADE PLUG TO WIDE SLOT FULLY INSERT.
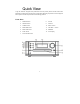
Quick View To get the maximum enjoyment and performance from this product, please read this manual and familiarize yourself with the functions and controls before attempting to operate it. Correct usage will assure years of trouble free performance and listening pleasure. Front View 1. POWER button 8. Phones 2. CD/MP3 button 9. CD Door 3. TUNER button 10. EJECT button 4. SKIP REW button 11. VOLUME +/- button 5. SKIP FWD button 12. SENSOR 6. STOP button 13. LCD Display 7.
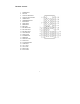
Remote Control 1. POWER button 2. KEY PAD 3. Track/Tune REW button 4. Track/Tune Forward button 5. CD/MP3 button 6. TUNER/BAND button 7. INTRO button 8. PROG. button 9. MEMO button 10. ESP button 11. MP3 Mode button 12. MP3 Clear button 13. MP3 Enter button 14. COLOUR button 15. Display button 16. M-DOWN button 17. RDM button 18. REP.M-UP button 19. STOP button 20. PLAY/PAUSE button 21. TONE button 22. VOL – button 23. VOL+ button 24. MUTE button 25.
Getting Started Unpacking your Installation RCD719 MP3 Micro System Speaker Connection Carefully remove your CD micro system from its 1. Unwind the cable from each speaker. packaging. You may wish to store the 2. At the rear of the CD micro system there packaging for future use. are two speaker sockets. Box Contents: - 3. Plug the speaker located on the left into the socket marked ‘L’ and coloured white.
Setting the Clock Remote Control The clock can be set by using the MEMO buttons on the remote control.When it is on standby Mode. The remote control requires 2 x AAA Lithium Battery (not included). Battery Installation 1. Setting the Clock Open the battery compartment cover. 1. Connect the main plug to a main supply scoket. 2. Press and hold the MEMORY button on the remote control, until the digit is Flashing. 3.
Operation Headphones Note: Reduce the volume to a low level before Now your CD micro system is installed and putting on headphones. Adjust volume ready for use, please refer to the following to a comfortable level. instructions for correct operation. A headphones socket is provided for private AC Power Operation listening. It is located on the front of the unit. The CD micro system will be in standby mode, see page 2. when the AC power supply is connected and switched on.
Radio holes for round head screws. These are not supplied. Operation Note: It is normal for the position of the antenna to be adjusted to achieve the best reception. If selecting the wall mounted option ensure that you can receive the radio stations you listen to before fixing. At the front of the CD micro system, or using the remote control, press POWER, to switch the CD micro system on. The LCD display will light up.
Preset Memory Stations Your CD/MP3 micro system can store up to 40 preset radio stations, 20 FM and 20 AM. Once a station is in a preset memory it can be retuned by pressing the REP.M-UP/M-DOWN button on the remote control until the desired preset number is displayed. To Preset Stations using the Remote Control 1. Press the Tuning buttons to select the desired frequency. 2. Press the MEMO button. MEMORY will flash on the display. 3.
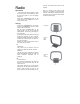
CD player 2. To pause playback, press the play/ pause button . The elapsed time will hold. 3. To resume playback press play/pause again. 4. To stop playback, press either STOP on the remote control or STOP on the unit. Operation Use the remote control or from the main unit, press CD/MP3, to switch the CD micro system on. The LCD display will light up. Set the function switch to CD. The display will initially flash zeros then show ‘no dIsc’. Only use CDs that bear the CD logo.
Random Play Stop Play 1. With the CD loaded, press RDM on the remote control. The tracks will be played in a random order. 1. Press STOP/ on the remote control or the unit. The display will show the total number of tracks and total playing time. 2. To cancel random play, either press RDM or STOP on the remote control, or STOP on the unit. 2. Press the EJECT button, to remove the CD from the compartment. Programmed Playback Up to 20 tracks can be programmed for Repeat Play PLAY MODE) playback.
MP3 Disc Playback - Press the MP3 MOD button to active the ID-3 function when the disc is stop running . Press the MP3 ENTER button to show the input display and type in the key word “BLUE” . To erase the previous input letter, you may press the MP3 CLEAR button once. Press MP3 ENTER button again to finish the input process and start searching the MP3. The unit wills automatic search all the root(s), album(s), title(s) and play the song(s) which relate to the word “BLUE”. Same functions as CD play. 1.
Care and Maintenance Compact Disc Care Fault Finding CD Handling Product will not operate. When handling CDs: - Ensure product is connected to the mains supply and switched ON. - Ensure the POWER pressed. - Do not touch the recorded surface. - Do not stick paper, or write, on either side of the CD. - Do not bend the CD. - Ensure speakers connected. CDs back in their cases, after use. - Adjust volume level. Do not expose CDs to direct sunlight, high temperature/humidity, for long periods.
Specification POWER SUPPLY 120V ~ 60Hz Radio FREQUENCY RANGE FM 87.5 - 108MHz AM Laser 530 - 1710kHz OPTICAL PICKUP Class 1 Laser Note: Specification subject to change without notice.