
Specifications


MAINTENANCE 6
21
6.12 HYDRAULIC HOSES _______________________________________________________
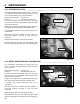
1. Always disengage all drives, engage parking brake,
stop engine and remove key before inspecting or
disconnecting hydraulic lines or hoses.
2. Check visible hoses and tubes daily. Look for wet
hoses or oil spots. Replace worn or damaged hoses
and tubes before operating the machine.
3. The replacement tube or hoses must be routed in the
same path as the existing hose, do not move clamps,
brackets and ties to a new location.
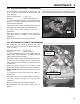
4. Thoroughly inspect all tubes, hoses and connections
every 250 hours.
IMPORTANT: The hydraulic system can be
permanently damaged if the oil becomes
contaminated. Before disconnecting any hydraulic
component, clean the area around the fittings and the
hose ends to keep impurities out of the system.
a. Before disconnecting any hydraulic component, tag
or mark the location of each hose then clean the
area around the fittings.
b. As you disconnect the component, be prepared to
assemble plugs or caps to the hose ends and open
ports. This will keep impurities out of the hydraulic
system and also prevent oil spills.
c. Make sure “O” rings are clean and hose fittings are
properly seated before tightening.
d. Keep the hose from twisting. Twisted hoses can
cause couplers to loosen as the hose flexes during
operation resulting in oil leaks.
e. Kinked or twisted hoses can restrict the oil flow
causing the system to malfunction and the oil to
overheat and also lead to hose failure.
6.13 HYDRAULIC RESERVOIR AND FILTER ________________________________________
Refer to Section 8.3 for specific maintenance intervals.
Normally the hydraulic system will not need additional fluid.
Sometimes a leak may develop causing the system to
require repair and refilling. If you notice a hydraulic fluid
escaping when the system is being used or if a leak is
suspected, turn off all hydraulic functions and stop the
engine.
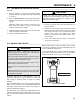
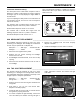
Periodically check the hydraulic fluid level (hydraulic level
should be checked every 100 hours of operation). Loss of
fluid can signal a small leak befor it becomes worse.
To check the fluid level:
1. Place vehicle on a flat and level surface. FUlly lower
any accessory attachment, including the dump box.
Stop the vehicle engine.
2. Remove the dipstick/breather tube from the top of
the tank. Wipe the dipstick, then place in tank with
the threaded flange resting on the tank (do not
screw in), Fluid should show on the knurled portion
of the dipstick.
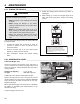
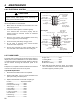
The hydraulic system is protected by one 10 micron filter
(A). The filter is located under the side console, near the
parking brake lever.
To replace hydraulic oil filter:
1. Remove the old filter.
2. Fill new filter with oil then install new filter. Hand
tighten only.
3. Operate engine at idle speed with hydraulic system in
neutral for five minutes.
4. Check hydraulic oil level and fill to knurled mark on
gauge.
Figure 6E
WARNING
To prevent serious injury from hot, high pressure oil,
never use your hands to check for oil leaks, use paper or
cardboard.
Hydraulic fluid escaping under pressure can have
sufficient force to penetrate skin. If fluid is injected into
the skin it must be surgically removed within a few hours
by a doctor familiar with this form of injury or gangrene
may result.
!
SHOWN AS
REFERENCE ONLY
HYDRAULIC
RESERVOIR DIPSTICK
KNURLED PORTION
OF DIPSTICK